
How to Safely Defrost a Freezer
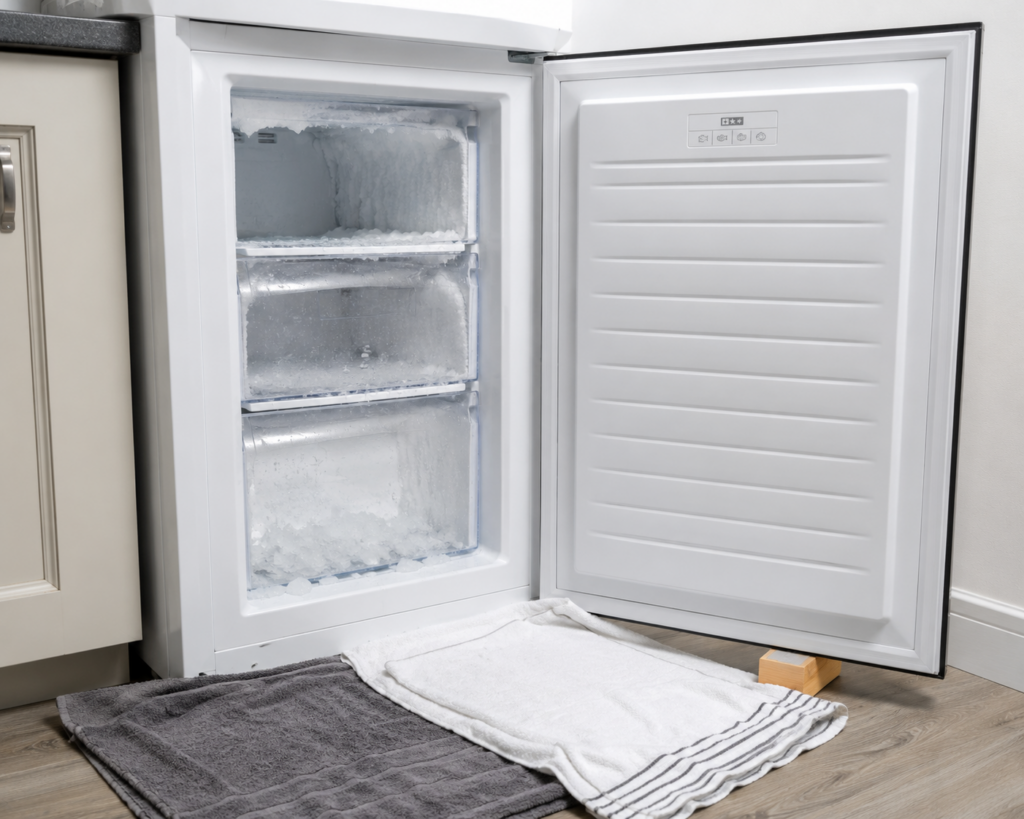

To safely defrost a freezer: transfer the food to a cool bag with ice packs or a friend’s freezer, switch the appliance off at the wall, prop the door open, place towels and a shallow tray around the base to catch meltwater, and let the ice melt naturally. Total time typically 4 to 8 hours for a moderately iced freezer, longer for heavily iced ones. Do not chip or scrape ice with sharp tools (you will puncture the evaporator and write off the appliance). Do not use a hairdryer on high heat directly on the ice (you will warp the plastic liner). A gentle warm-water bowl inside the freezer speeds things up safely if you need it faster. Wipe dry, switch back on, wait 30 minutes for the freezer to reach temperature, then reload the food.
Do you actually need to defrost your freezer?
Before starting, it is worth checking whether defrosting is genuinely needed. Frost-free freezers should not require manual defrosting because they run an automatic defrost cycle internally. If a frost-free freezer has built up visible ice, that indicates a fault (usually a failed defrost heater or timer) rather than a need to manually defrost. See our related pieces on frost-free automatic defrosting and frosting up in fridge or freezer for the diagnostic detail.
Manual-defrost freezers and older frost-free models with degraded automatic defrost need periodic defrosting when ice buildup reaches around 5mm on the walls or shelves. Beyond that thickness, the ice reduces cooling efficiency (frost acts as insulation), reduces usable storage capacity, and forces the compressor to run longer to maintain temperature. Households in the UK typically need to defrost a manual freezer every 6 to 12 months, more often if the appliance is used heavily or if the door seal is starting to perish.

Ice thicker than around 5mm on the internal walls or shelves. Drawers or baskets that will not slide freely because ice has grown into them. The door not closing properly because ice has built up around the seal. Reduced cooling performance (food not staying as firmly frozen as it did). Rising electricity bill without any change in usage pattern (the compressor is working harder to overcome ice insulation).
The step-by-step defrost routine
The sequence below is the safe, non-damaging way to defrost any freezer. Total active work is about 45 minutes spread across the process, plus 4 to 8 hours of waiting for the ice to melt naturally.

Step 1: Plan the timing
Choose a day when you can commit 4 to 8 hours to the process. Ideally start early morning so the freezer is defrosted and repopulated by evening. Eat down the freezer contents in the days beforehand to minimise the food you need to transfer. If you have a chest freezer or an American-style freezer with substantial contents, plan for a full day.

Step 2: Store the food safely
Frozen food stays properly frozen for around 4 hours in a well-insulated cool bag with ice packs, or up to 24 hours in a chest freezer or friend’s freezer. Options in order of preference: transfer to a friend’s or neighbour’s freezer, transfer to a spare freezer if you have one, use large cool bags with ice packs and blocks of ice, or pack tightly together and cover with thick blankets in the coldest part of the house (this works because a large mass of frozen food acts as its own thermal reservoir for a few hours). Food that partially thaws can be refrozen if it still has ice crystals inside, though texture may be affected. See our related piece on how to save food if the freezer isn’t working for the wider food safety guidance.

Step 3: Switch off and unplug
Switch the freezer off at the wall socket and unplug it. Do not simply set the temperature to “off” via the control panel, because on many models this leaves internal circuitry live. Water and live electrics do not mix, and defrosting produces water. Unplug fully.

Step 4: Prepare for meltwater
The volume of meltwater from a heavily iced freezer can be surprising, often 2 to 5 litres. On upright freezers, place old towels along the base of the freezer and folded towels on the floor in front of the appliance. Have a shallow tray positioned at the base of the freezer to catch drips as ice loosens. On chest freezers, pull the drain plug at the base if there is one, and route a hose or drainage tray to catch the water. Some modern models have a drain hose specifically for this purpose behind a small access panel. Check the user manual if unsure.

Step 5: Open the door and wait
Open the freezer door fully and prop it with a towel or a suitable object so it cannot swing closed. Room-temperature air circulating into the freezer is what melts the ice. In a normal room-temperature UK home (18°C to 22°C), a moderately iced freezer defrosts in 4 to 8 hours from door-open time. Very heavily iced freezers can take 12 hours or more. Do not accelerate by physically removing ice at this stage — it will loosen and fall off on its own.

Step 6: Wipe out the interior thoroughly
Once all the ice has melted, wipe the interior with a cloth dampened with warm soapy water, then dry thoroughly. Pay particular attention to drawer runners, shelf slots, and the door seal (both the rubber itself and the recess it sits in). This is the once-in-6-to-12-months opportunity to give the interior a proper clean. Bicarbonate of soda dissolved in warm water eliminates any residual freezer smells. Do not use bleach, ammonia, or abrasive cleaners on the interior — they can damage plastic surfaces and leave harmful residues.

Step 7: Switch back on and wait for temperature
Plug the freezer back in, set to the correct temperature (typically -18°C for domestic freezers), and close the door. Wait at least 30 minutes for the interior to reach freezing temperature before reloading food. Some engineers recommend up to 2 hours for chest freezers and larger units. Reloading immediately puts warm items into a warming space and defeats the purpose of the defrost.
Step 8: Reload strategically
Put the items with the largest thermal mass (blocks of ice, large frozen joints, big containers) in first. Smaller items go on top. Try to fill the freezer at least two-thirds full where possible — a full freezer holds temperature better than a sparse one because the frozen food itself acts as thermal ballast. Empty air pockets warm up quickly whenever the door opens.
Speeding it up safely
If you need the defrost completed faster than natural melting allows, several safe techniques can help. All of the methods below are engineer-approved and will not damage the appliance. Some very common “speed up” tricks are actively harmful and are covered in the next section.

Bowls of warm (not boiling) water
Place a heat-safe bowl of warm tap water (around 40°C to 50°C, comfortable to touch) on a folded towel on each freezer shelf. Close the door for 20 minutes. The steam and warmth accelerate melting significantly. Refresh the water as it cools. This is the single safest and most effective method to speed up defrosting. Never use boiling water — the temperature shock can crack plastic components or warp shelves.

Fan blowing warm room air in
Positioning a household fan to blow warm room air into the open freezer significantly accelerates melting. Circulating air transfers heat far more efficiently than still air. This works particularly well in warmer rooms or during summer months. Position the fan safely well away from any water that will accumulate.
Removing loose ice as it detaches
As ice loosens naturally during the defrost, you can lift free chunks out with your hands and drop them in the sink to melt separately. This is safe and speeds things up without risk to the appliance. What is not safe is prying, chipping, or breaking off ice that is still firmly attached — see the next section.
Warm damp cloths on stubborn ice
For patches of ice that are melting more slowly than others, a warm damp cloth pressed against them for a minute or two accelerates local melting. Rinse the cloth in warm water between applications. This is much gentler than any tool-based approach and does not risk damaging the interior surfaces.
What never to do
Several common “speed up the defrost” techniques appear on lifestyle websites and social media and are actively harmful to the appliance. The list below covers the ones that most commonly cause damage that renders a freezer uneconomical to repair.

Chipping, prying, or scraping ice with a knife, screwdriver, ice pick, or similar sharp tool. Using a hairdryer, heat gun, or steam cleaner directly on the ice. Pouring boiling water into the freezer. Using a fan heater blowing directly into the interior. Trying to remove ice while the appliance is still plugged in. Using metal implements of any kind inside the freezer.
Why sharp tools are so dangerous
Behind the internal plastic liner of every freezer, the evaporator coils carry pressurised refrigerant. These coils are often only a few millimetres behind the visible interior surface. A single knife slip, screwdriver stab, or careless chip with an ice pick punctures the evaporator, releases the refrigerant, and instantly writes off the appliance. Refrigerant leak repair is uneconomical on most domestic freezers because it requires evacuating and re-charging the sealed system. The number of freezers destroyed each year in the UK by ice-picking accidents is significant, and every one of them was avoidable.

Why hairdryers and heat guns are risky
The interior plastic of a freezer is designed to operate below freezing and is not rated for direct high-heat exposure. A hairdryer on hot setting held close to the plastic liner will warp, crack, or melt it locally. The damage is often invisible until the freezer is switched back on and refuses to reach temperature because of an air leak through the damaged panel. Heat guns and steam cleaners are worse — even brief contact can cause structural damage. If you must use a hairdryer, only use it on the cold-air setting, at least 30cm away from any surface, and only aimed at the ice rather than the plastic behind it. Even then, the warm-water-bowl method is safer and more effective.

Why boiling water is a bad idea
The temperature shock of boiling water against freezer plastic (which has just been at -18°C or below) can crack shelves, warp the liner, and damage seals. Warm water in a bowl works because the heat transfer is gradual. Boiling water poured directly onto surfaces is a fast route to damaging the appliance permanently.
Why electrical items inside a defrosting freezer are dangerous
A defrosting freezer contains an increasing amount of standing water. Plugging any electrical item into a socket near or inside a freezer while defrosting is a genuine electrical safety risk. Fan heaters, hairdryers, and any other mains-powered device should be kept well away from the appliance and any pooled water. If a device slips into the water, do not touch it — turn off the power at the consumer unit first.
How often should you defrost?
The right defrost frequency depends on the freezer type and how it is used. The rough guidance below covers most UK households.
| Freezer type | Typical defrost frequency | Signs of need |
|---|---|---|
| Frost-free (upright or fridge-freezer) | Should not require manual defrosting | Any visible ice buildup indicates a fault, not a maintenance need |
| Manual defrost upright freezer | Every 6 to 12 months | Ice buildup over 5mm on walls or shelves |
| Manual defrost chest freezer | Every 12 to 18 months | Ice buildup reducing usable capacity |
| Freezer with degraded door seal | Every 3 to 6 months (with seal repair a priority) | Rapid ice buildup, door not sealing properly |
| Freezer in a warm room or with heavy use | Somewhat more frequently than baseline | More frequent condensation and ice formation |
Frost-free freezers that have started building up visible ice have almost certainly developed a fault with the automatic defrost system. Common failure modes are a burnt-out defrost heater element, a failed defrost timer or thermostat, a blocked defrost drain (the small hole that carries meltwater away during the auto-defrost cycle), or a control board fault. Repair typically costs £100 to £220 and is worth doing on machines under 8 years old. See our appliance repair booking for diagnostic and repair.
Preventing rapid ice buildup between defrosts
Some households find their manual freezer builds up ice more quickly than it should, requiring more frequent defrosting. The most common causes are practical rather than mechanical and are worth addressing before the next defrost cycle.
Door seal condition
A perished or distorted door seal lets warm humid air enter the freezer, where the moisture immediately freezes onto the coldest surfaces. This is the single largest cause of rapid ice buildup. Test by closing a piece of paper or a £5 note in the door and trying to slide it out. If it slides out easily, the seal is not gripping properly. Replacement seals typically cost £30 to £70 for the part; qualified fitting adds £80 to £150.

Frequent door opening
Every time the freezer door opens, warm humid room air enters and adds moisture. Households where the freezer is frequently opened (many quick trips rather than fewer planned ones) build up ice faster. Organising the freezer so items are quick to find and the door stays open for less time makes a meaningful difference over months.
Wet food being placed in the freezer
Food placed in the freezer damp or in wet packaging releases that moisture into the internal air as it freezes. Over time this contributes measurably to ice buildup. Wrap food in dry containers or freezer bags before placing inside, and blot any surface moisture from packaging before storing.
Freezer temperature set too cold
A freezer set to -22°C or -25°C runs the compressor more frequently and encourages more moisture to condense as ice. The correct target is -18°C for domestic use, which is what UK food safety guidance recommends. Check the temperature setting and reduce it toward -18°C if it is set colder. See our related piece on correct fridge and freezer temperatures and climate classes for the wider context on ambient temperature.
Food safety during and after the defrost
The food safety window during a freezer defrost is the concern most people worry about most. In practice, following the basics keeps food entirely safe.

The 4-hour window
Frozen food starts to warm above -18°C fairly quickly once removed from a working freezer. The general Food Standards Agency guidance is that food that has warmed above 8°C for more than 4 hours should not be refrozen. In practice, food in a well-insulated cool bag with ice packs stays below 8°C for around 4 hours; a densely packed cool bag with ice blocks can extend this to 6 or even 8 hours. Larger frozen items (joints of meat, whole loaves) stay cold longer than smaller items.

What can be safely refrozen
Food that still has ice crystals inside can be refrozen safely. Food that has fully thawed but stayed below 4°C throughout can be refrozen but the texture will suffer noticeably (particularly with meat and fish). Cooked food that has been thawed is generally not safe to refreeze once cooled. When in doubt, cook thawed food thoroughly and eat within a day, rather than refreezing.
What must be discarded
Any raw meat, poultry, fish, seafood, or dairy that has warmed above 8°C for more than 4 hours should be discarded rather than refrozen or cooked. The risk of bacterial growth (particularly of pathogens like Salmonella, Listeria, and E. coli) makes this not worth the food value. Ice cream and soft-freeze products that have fully melted should be discarded rather than refrozen. When in doubt, the cost of replacing a small amount of food is significantly less than the cost of food poisoning.

If the defrost was unplanned
If the freezer defrosted itself due to a fault (power failure, appliance breakdown, forgotten switch-off) rather than as a planned maintenance, the food value at stake may be significant. Home insurance and some appliance warranties cover food loss from freezer breakdowns; check your policy details before disposing of anything. See our related pieces on claiming for spoiled food when a freezer breaks down and how to save food if the freezer isn’t working.
The Whitegoods Help view
Manual defrosting is one of the household maintenance tasks that has quietly disappeared from most UK homes over the past 20 years as frost-free freezers have become the default. For households that still have a manual-defrost freezer (or an American-style or chest freezer where manual defrost remains standard), the routine is straightforward when done correctly and completely optional trouble when done incorrectly.
The single most important thing to know is that patience beats every attempt to speed things up unsafely. A freezer that is defrosted with time, warm-water bowls, and a fan takes 4 to 8 hours and never gets damaged. A freezer that is defrosted with an ice pick or a hairdryer at close range is either fine or written off. The number of freezers scrapped every year in the UK because someone slipped with a knife or melted the interior liner is far higher than it needs to be.
The wider observation is that frost-free freezers have removed this maintenance task for most people, but at the cost of a defrost heater and control system that eventually wears out. When a frost-free freezer starts building up ice, that is a fault to diagnose rather than a manual defrost to perform. Continuing to manually defrost a frost-free unit as a workaround for a broken automatic defrost is a genuine short-term option, but the underlying fault will get worse over time and the appliance is telling you it needs a proper repair. See our appliance repair booking for diagnostic and repair on frost-free defrost faults.
Need help with a freezer fault?
If your freezer needs manual defrosting more frequently than expected, if the automatic defrost has stopped working on a frost-free model, or if the appliance is not returning to temperature properly after defrost, our nationwide repair service and spare parts service cover all major UK freezer brands.
Frequently asked questions
How long does it take to defrost a freezer?
A moderately iced freezer (5-10mm of ice buildup) typically defrosts in 4 to 8 hours at normal UK room temperature (18-22°C) with the door propped open. Heavily iced freezers (15mm+ of ice) can take 12 hours or more. The warm-water-bowl method plus a fan blowing room air into the open freezer cuts these times roughly in half. Frost-free freezers do not require manual defrosting.
Do I need to defrost a frost-free freezer?
No, in normal operation. Frost-free freezers run an automatic defrost cycle every 6 to 12 hours that melts any ice on the internal evaporator and drains the meltwater away. If a frost-free freezer is building up visible ice, that indicates a fault with the automatic defrost system (typically a failed defrost heater, timer, or blocked drain) rather than a need for manual defrosting. See our frost-free defrosting guide.
Can I use a hairdryer to defrost a freezer faster?
Not recommended. A hairdryer on hot setting held close to the interior plastic can warp, crack, or melt the liner. The damage is often invisible until the freezer is switched back on and refuses to reach temperature. If you must use one, only use the cold-air setting, at least 30cm away from any surface, aimed at ice rather than plastic. The warm-water-bowl method (heat-safe bowls of 40-50°C water placed inside on towels for 20 minutes at a time) is safer and more effective.
Can I chip ice out of the freezer with a knife or ice pick?
Never. The evaporator coils behind the freezer’s internal plastic liner are only millimetres from the visible surface. A single slip with a sharp tool punctures the evaporator, releases the pressurised refrigerant, and instantly writes off the appliance. Refrigerant leak repair is uneconomical on most domestic freezers. Let the ice melt naturally, or use warm water bowls to accelerate — never a sharp tool.
What do I do with the food while the freezer is defrosting?
Transfer to a friend’s or neighbour’s freezer if possible. Otherwise use large cool bags with ice packs and blocks of ice, which keep food safely frozen for around 4 to 6 hours. Alternatively pack the food tightly together and cover with thick blankets in the coldest part of the house — a large mass of frozen food acts as its own thermal reservoir. Eat down the freezer contents in the days beforehand to minimise the volume that needs transferring.
How often should I defrost my freezer?
Manual-defrost upright freezers typically every 6 to 12 months. Manual-defrost chest freezers every 12 to 18 months. The trigger is ice buildup thicker than around 5mm on the internal walls or shelves. If your freezer is building ice faster than that, the door seal is the most likely cause. Frost-free freezers do not require manual defrosting.
Can I refreeze food after the defrost?
Food that still has ice crystals inside can be refrozen safely. Food that has fully thawed but stayed below 4°C throughout can be refrozen but with texture loss. Raw meat, poultry, fish, and dairy that has warmed above 8°C for more than 4 hours should be discarded rather than refrozen. Cooked food that has been fully thawed generally should not be refrozen — cook and eat within 24 hours instead.
Why is my freezer building up ice so quickly?
The most common cause is a perished or damaged door seal letting warm humid air in. Test by closing a £5 note in the door and trying to slide it out — if it slides easily, the seal is not gripping. Other common causes include frequent door opening, food placed in the freezer while damp, and the temperature set colder than needed (-18°C is the correct target, not -22°C or -25°C).
Should I switch the freezer off at the wall or just via the control panel?
Always switch off at the wall socket and unplug. Setting the temperature to “off” on the control panel leaves internal circuitry live on many models. Water and live electrics do not mix, and defrosting produces water. Unplug fully before starting the defrost.
How long should I wait before reloading food after switching the freezer back on?
At least 30 minutes for upright freezers, up to 2 hours for larger chest freezers. This lets the interior reach freezing temperature before warm items are added. Loading immediately puts warm items into a warming space and defeats the purpose of the defrost. When reloading, put items with the largest thermal mass in first, and try to fill the freezer at least two-thirds full — a full freezer holds temperature more efficiently than a sparse one.
Ask the repair forum
Post the make, model and symptoms and get help from the Whitegoods Help community.
0 Comments