Appliance stuck behind a tiled floor

The key to getting a stuck appliance over tiles is to lower the feet as much as possible to reduce the appliance height, giving enough clearance to lift it over the tile edge. Work through the front feet first, then the back. If the back feet cannot be raised or removed, the options are limited to removing the worktop or, in worst cases, cutting channels in the flooring in front of the feet.

If you are planning a kitchen refit or have not yet tiled, read the companion guide before you start: fitting floor tiles in front of appliances. Prevention is considerably easier than the solutions on this page.
Why does this happen?
The situation typically occurs when floor tiles or cushion flooring are laid up to the front of an appliance that sits beneath a worktop. When the appliance needs to be pulled out – for a repair, replacement, or move – the tile edge acts as a barrier the feet cannot clear. The worktop above prevents lifting the appliance high enough to get over the tiles.
The amount of clearance available is usually very small, sometimes only a few millimetres. Every millimetre gained by lowering the feet is valuable.
Step 1: How do you lower the front feet?
Most appliances have adjustable feet. The goal is to screw the front feet in as far as possible to reduce the appliance’s height at the front, creating more room to tilt the front up and over the tile edge.
-
Take weight off the front feet. Lift the front of the appliance slightly to take its weight off the front feet. You may need a second person to help with this.
-
Check for locking nuts. Check whether there is a locking nut on each front foot. If so, loosen and wind it down the thread first to free the foot for adjustment.
-
Screw the feet in fully. Screw the front feet in as far as they will go, reducing the height of the appliance at the front.
-
Pull forward and tilt. Try pulling the appliance forward until the front feet meet the tile edge, then lifting the front slightly to clear the tiles. If successful, pull forward until the back feet reach the tile edge and repeat the process for the back.
Once the front feet are wound in, placing a folded towel underneath the front of the appliance can help it slide more easily and prevents scratching the flooring. This is particularly useful if the front feet have been removed entirely.
Step 2: How do you adjust the back feet?
If the front of the appliance clears the tiles but the back feet then hit the tile edge, the back feet also need to be lowered. This is where freestanding and built-in appliances differ significantly.
The back feet cannot normally be reached directly with the appliance in place. Try pulling the front of the appliance outward to create a slight tilt that lifts the back feet, then sliding the appliance forward. A towel under the front feet helps with sliding. This requires some force and often a second person.
Many built-in appliances have a rod mechanism that runs from front to back, allowing the rear feet to be adjusted from the front using a screwdriver. The adjustment screws are usually accessible from behind the kick strip at the bottom front of the appliance. See the photo below.
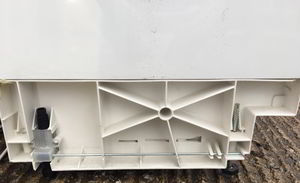
Side view of a built-in appliance (front on the right). The rod running from front to back adjusts the rear feet. The adjustment screws are accessible from behind the kick strip at the front.
Step 3: Can you remove the front feet entirely?
If screwing the front feet in as far as they will go still does not provide enough clearance, try removing the front feet completely. This gains a few extra millimetres of tilt, which can sometimes make the critical difference.
With the front feet removed, place a folded towel underneath the front of the appliance to protect the floor and help it slide. Pull the appliance forward while tilting the front upward to lift the back feet above the tile edge.
Step 4: Should you consider removing the worktop?
If the back feet still cannot clear the tiles despite all adjustments, the problem is the worktop preventing the necessary upward movement at the back. Removing the worktop would give the headroom needed.
In practice, worktops fitted over appliances are usually sealed and integrated and cannot easily be removed without damage. If a sink is fitted to the worktop, removal becomes even more complex. This option is worth considering but is not usually practical.
Before pulling a built-in appliance, check for any device fixed to the top of the appliance designed to clamp it against the underside of the worktop. These must be fully loosened or removed before attempting to pull the appliance out. Forgetting this is a common cause of an appliance that will not budge at all.
Last resort: cutting channels in the flooring
When all other options are exhausted and the worktop cannot be removed, the only remaining option is to cut away enough flooring in front of each foot to allow the appliance to come forward.

This is a last resort that should only be attempted when the appliance genuinely cannot be moved any other way. The result will require repair or concealment of the floor area afterwards.
The following describes a real case encountered by Whitegoods Help engineers. A dishwasher had tiles fitted right up to the front of it, with cushion floor on top of the old tiles. It was fitted beneath a worktop that had been installed too low, allowing the dishwasher to lift only approximately 5mm, not enough to clear the tiles. The worktop could not be removed because it had a sink fitted to it. With the front feet wound in as far as possible, the dishwasher was still completely stuck.
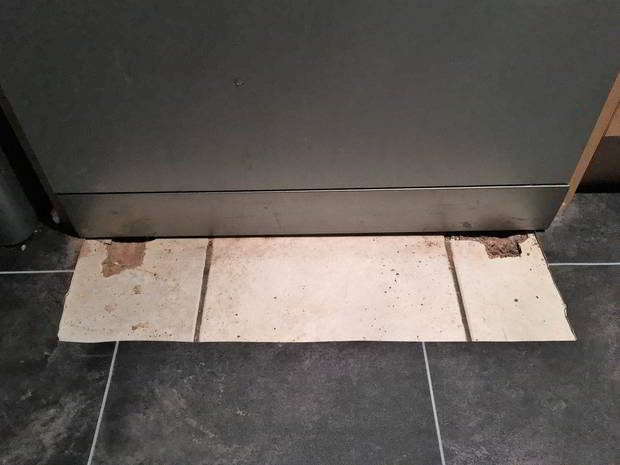
The result of cutting channels into the tiles and flooring in front of the two front feet. A strip of floor covering was cut away, then two channels were drilled and chiselled to allow the feet to come forward. The strip was laid back in place but the damage to the tiles was unavoidable.
The only solution was to cut a strip of the floor covering away, mark the position of the two front feet, and spend approximately 20 minutes drilling small holes and chiselling out two shallow channels in the tiles beneath to allow the feet to move forward. Once the feet had clearance, the dishwasher could be lifted over the remaining tiles and removed.
The floor covering strip was placed back over the channels afterwards, which concealed the worst of the damage. The tile damage itself remained visible. This outcome illustrates why fitting tiles in front of appliances is such a significant problem – the repair to the appliance cost far less time and money than the damage caused getting it out.
Related guides
For prevention before tiling, the right method for pulling a washing machine out, or to book an engineer to handle the job, see our related guides.
Frequently asked questions about appliances stuck behind tiles
Why is my appliance stuck behind the tiles?
When tiles or cushion flooring are fitted right up to the front of an appliance that sits beneath a worktop, the tile edge creates a barrier the feet cannot clear when the machine is pulled forward. The worktop above prevents the appliance being lifted high enough to get over the tiles. The tighter the worktop clearance, the harder the problem becomes to solve.
How do I lower the back feet on a built-in appliance?
Many built-in appliances have an adjustment rod that runs from the front of the machine to the back feet. The adjustment screws are usually accessible from behind the kick strip at the bottom front of the appliance and can be turned with a screwdriver. This allows the back feet to be raised or lowered without accessing the rear of the machine.
What if I cannot reach the back feet on a freestanding appliance?
The back feet on freestanding appliances cannot normally be reached directly. Try pulling the front of the appliance outward while tilting it slightly to lift the back feet above the tile edge, then sliding it forward. Placing a folded towel under the front of the appliance helps it slide without scratching. This usually requires two people.
Can removing the front feet help?
Yes, removing the front feet entirely rather than just screwing them in gives a few extra millimetres of tilt that can sometimes make the critical difference. With the front feet removed, place a folded towel underneath to protect the floor, then try pulling the appliance forward and tilting the front upward to lift the back feet clear of the tiles.
What if nothing works and the appliance is completely stuck?
If all foot adjustments have been exhausted and the worktop cannot be removed, the only remaining option is to cut channels in the flooring in front of the feet to allow them to move forward. This damages the flooring and should genuinely be a last resort. The channels can often be partially concealed by replacing the floor covering strip, but tile damage will be visible. This situation is entirely avoidable by not fitting tiles right up to appliances in the first place.
How do I check for a built-in clamping device before pulling the appliance?
Built-in appliances are often secured to the underside of the worktop by metal brackets that pass through the top of the appliance and screw into the worktop above. Open the door and look upward inside the appliance frame, or look down from the top edges of the appliance front, to spot the brackets. They typically have a single screw on each side. Loosen these fully before attempting to pull the appliance out. On dishwashers and integrated washing machines specifically, these brackets are nearly always present and forgetting them is one of the most common reasons people cannot move what should be a movable appliance.
2 Comments
Grouped into 2 comment threads.
0 replies Thank you. Very well described hacks. Unfortunately I too had to resort to floor surgery!
0 replies The other problem with not tiling under appliances is that the edge of the floor covering can have a nice sharp lip. Some freezers have very little ground clearance and, as you push them over the lip on the edge of the floor, the vapour barrier on the warm side (the room side) of the insulation gets torn. Since some types of insulation can absorb water, water vapour from the air in the room is now able to penetrate and condense behind and in the insulation, rendering the insulation less effective as it becomes sopping wet. Then the water starts to drip onto the floor under the freezer. I did manage to cut out most of the wet insulation and dry the freezer out over a summer in a greenhouse, re-insulate to some degree, and fit a new vapour barrier, but the insulation was never as effective as before and I eventually, and reluctantly, disposed of that freezer.
The other problem with not tiling under appliances is that the edge of the floor covering can have a nice sharp lip.
Some freezers have very little ground clearance and, as you push them over the lip on the edge of the floor, the vapour barrier on the warm side (the room side) of the insulation gets torn. Since some types of insulation can absorb water, water vapour from the air in the room is now able to penetrate and condense behind and in the insulation, rendering the insulation less effective as it becomes sopping wet. Then the water starts to drip onto the floor under the freezer.
I did manage to cut out most of the wet insulation and dry the freezer out over a summer in a greenhouse, re-insulate to some degree, and fit a new vapour barrier, but the insulation was never as effective as before and I eventually, and reluctantly, disposed of that freezer.
Thank you. Very well described hacks. Unfortunately I too had to resort to floor surgery!