How to Clean an Oven

To clean a conventional or fan oven properly, remove and soak the racks, apply an oven cleaner or bicarbonate of soda paste to the interior, leave it to work, then wipe clean and finish with the door glass. The active work takes around 30 to 40 minutes, with a soaking period of several hours or overnight in between. Cleaning the oven every three months prevents heavy build-up and keeps the appliance performing efficiently and safely.
Why does an oven need regular cleaning?
Grease, food residue, and spillages that are not cleaned away accumulate on the oven interior with every use. Over time this build-up carbonises on the oven walls, base, and door glass, becoming progressively harder to remove. Heavy grease build-up can also cause smoke during cooking, affect the flavour of food, and in extreme cases pose a fire risk.
A clean oven also performs more efficiently. A thick layer of carbonised grease on the oven base or walls acts as an insulator, causing the oven to take longer to reach the correct temperature and to distribute heat less evenly. Cleaning regularly is one of the simplest ways to keep an oven running correctly for longer.
For fault diagnosis if your oven is not heating correctly or showing an error code, see our cookers and ovens advice section.
What type of oven do you have?
The cleaning method and effort required varies significantly depending on the type of oven. Check which of these applies before starting.
 Conventional or fan oven
The most common type in UK homes. Requires manual cleaning using either a proprietary oven cleaner or a natural alternative such as bicarbonate of soda. This guide covers this type in full detail.
 Pyrolytic self-cleaning oven
Heats to around 500°C to incinerate grease and food residue to ash, which is then wiped away with a damp cloth. The most effective and lowest-effort cleaning method available. Covered in a separate section below.
 Oven with catalytic liners
Has specially coated side panels that absorb and burn off grease at normal cooking temperatures. The liners clean themselves during use but cannot be cleaned with chemical oven cleaners, which damage the coating permanently. Covered below.
 Combination microwave oven
Requires a gentler approach than a conventional oven. Avoid abrasive cleaners and harsh chemicals that can damage the microwave interior coating. A warm water and washing-up liquid solution is usually sufficient for the interior.
What do you need before you start?
 Rubber gloves, particularly if using a chemical oven cleaner
- Proprietary oven cleaner spray or gel, or bicarbonate of soda and white vinegar for a natural alternative
- A large plastic bag or bin liner for soaking oven racks
- Warm water and washing-up liquid
- Non-scratch scouring pad or stiff cleaning brush
- Soft cloths and paper towels
- An old toothbrush for tight corners and hinges
- A plastic scraper or spatula for loosening heavy carbonised deposits

Always ensure the oven is completely cool before cleaning. Never apply oven cleaner to a warm or hot oven. Open windows and ensure good ventilation when using chemical oven cleaners, as the fumes can be strong and irritating. Keep pets and children out of the kitchen while chemical cleaners are in use.
How do you clean a conventional or fan oven step by step?
Step 1: Remove and soak the oven racks
The racks are often the most heavily soiled part of the oven and benefit from a long soak to loosen grease before scrubbing. Starting them first allows them to soak while you work on the rest of the oven.
-
Remove all racks, trays, and the base plate if it lifts out, and place them into a large plastic bag or the bath lined with old towels to protect the surface.
-
Pour enough warm water into the bag to submerge the racks, add a generous squirt of washing-up liquid or a cup of biological washing powder, and seal the bag. Alternatively, apply oven cleaner spray directly to the racks inside the sealed bag.
-
Leave the racks to soak for at least two hours, or overnight for heavily soiled racks. The longer they soak, the easier the grease and carbonised residue will be to remove.
-
After soaking, scrub the racks with a non-scratch scouring pad, working along the rails and paying attention to the ends where grease collects most heavily.
-
Rinse the racks thoroughly under warm running water and dry before replacing them in the oven.
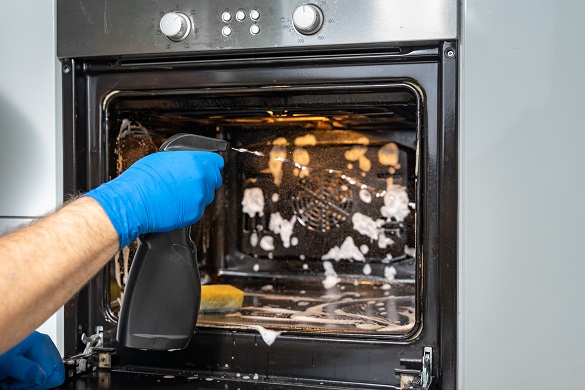
Step 2: Apply oven cleaner to the interior
With the racks removed, apply your chosen cleaner to the interior walls, base, and roof of the oven. Work methodically to ensure all surfaces are covered.
Using a proprietary oven cleaner
Apply the cleaner according to the product instructions, usually by spraying or applying a gel liberally to all interior surfaces. Most products work best if the oven is very slightly warm (around 50°C) rather than completely cold, but always follow the specific product guidance. Close the oven door and leave for the time stated on the packaging, typically two to eight hours or overnight for heavy soiling.
Using bicarbonate of soda
Mix bicarbonate of soda with a small amount of water to form a thick paste. Apply it generously to all interior surfaces, avoiding the heating elements. Leave for at least four hours, or ideally overnight. The bicarbonate of soda breaks down grease and carbonised deposits without harsh chemicals and is safe for use in all conventional ovens.
Do not apply oven cleaner or bicarbonate of soda paste directly to the heating elements, fan, thermometer probe, or any electrical components inside the oven. On gas ovens, avoid applying cleaner around or near the gas burner. Always consult the oven manufacturer’s instructions regarding approved cleaning products for your specific model.
Step 3: Wipe out the interior
After the cleaner has been given sufficient time to work, wipe the interior clean thoroughly.
-
Use a damp cloth to remove the bulk of the loosened grease and residue from the walls, base, and roof. Rinse the cloth frequently and work in sections.
-
For any areas where carbonised deposits remain, use a plastic scraper gently to lift the residue before wiping. Do not use metal scrapers, which can scratch the oven enamel.
-
Use an old toothbrush to clean into the corners, around the door hinges, and along the door seal channel where grease accumulates in narrow spaces that a cloth cannot easily reach.
-
Wipe the entire interior down with a clean damp cloth to remove all traces of cleaning product. Remaining cleaner residue will smoke when the oven is next used, so thorough rinsing is important.
-
Dry the interior with a clean cloth or paper towels and leave the door open for a short period to allow any remaining moisture to evaporate before closing.
Step 4: Clean the oven door glass
The door glass is often the most visibly soiled part of the oven and one of the most satisfying to restore. Most oven door glass can be cleaned from the inside using the same approach as the oven interior.
-
Apply oven cleaner or bicarbonate of soda paste to the inner surface of the door glass and leave to work for the same period as the interior.
-
Wipe clean with a damp cloth, using a plastic scraper if needed for stubborn carbonised spots. Work in circular motions rather than scrubbing hard in one direction.
-
Clean the outer glass with a glass cleaner or warm soapy water and a soft cloth. Do not spray glass cleaner inside the oven.
-
Inspect the glass for any chips or cracks. A cracked oven door glass should be treated as a safety concern and replaced before the oven is used again. Replacement door glass for most oven models is available through our appliance spare parts section.
Some ovens allow the door to be removed or disassembled to clean between the inner and outer glass panels, which can accumulate grease that causes a brown or smoky appearance that cannot be removed from either surface alone. Refer to your oven’s manual for guidance on whether door disassembly is supported on your model and how to do it safely.
Step 5: Clean the door seal
The rubber or silicone seal around the oven door prevents heat from escaping during cooking. Use a damp cloth and a small amount of washing-up liquid to wipe the seal clean, working carefully around its full circumference.
Do not use abrasive pads or harsh chemical cleaners on the door seal, which can cause the rubber to crack or perish prematurely. Inspect the seal for any damage while cleaning. A damaged oven door seal should be replaced, as it will reduce cooking efficiency and can allow heat to escape dangerously close to surrounding cabinetry. Replacement door seals are available through our spare parts section.
Step 6: Clean the oven exterior and control panel
Wipe down the outside of the oven, including the door front, handle, and sides, with a damp cloth and a small amount of washing-up liquid. For stainless steel surfaces, wipe in the direction of the grain to avoid visible scratching.
Clean the control knobs or touch panel with a barely damp cloth only. Do not spray cleaning products directly onto control panels, and never immerse knobs in water unless the manufacturer explicitly states they are removable and washable. Use an old toothbrush to clean around the base of each knob where grease collects.
Step 7: Run the oven empty before cooking
After cleaning, run the oven empty at a moderate temperature (around 180°C) for 15 to 20 minutes with the kitchen ventilated. This burns off any final traces of cleaning product residue and confirms the oven is heating correctly before you use it for food.
How do you use a pyrolytic self-cleaning oven?
Pyrolytic ovens heat to approximately 480°C to 500°C during the cleaning cycle, incinerating all grease and food residue to a fine ash that is simply wiped away with a damp cloth once the cycle is complete and the oven has cooled fully.
-
Remove all racks and trays from the oven before starting the pyrolytic cycle. Most pyrolytic ovens do not allow standard racks to remain inside during the cycle as the extreme heat will discolour or damage them. Some ovens are supplied with special pyrolytic-safe racks that can remain inside.
-
Remove any large loose food debris from the oven base before starting, as excessive soiling may produce more smoke during the cycle than usual.
-
Select the pyrolytic cleaning function on the control panel. The cycle typically runs for two to three hours depending on the soiling level selected. The oven door will lock automatically for safety and will not release until the interior has cooled to a safe temperature.
-
Ensure the kitchen is well ventilated during the cycle. Some smoke and smell is normal, particularly on the first use or after heavy soiling. The amount of smoke produced varies between models and the degree of soiling.
-
Once the cycle is complete and the door has unlocked, allow the oven to cool fully. Wipe the interior with a damp cloth to remove the ash residue.
Keep the kitchen well ventilated during a pyrolytic cycle and keep pets, particularly birds, out of the room. The fumes produced during pyrolytic cleaning at very high temperatures can be harmful to pet birds. Never attempt to force the door open during a pyrolytic cycle. The automatic door lock is a safety feature and will release only when the interior temperature has dropped to a safe level.
How do you clean an oven with catalytic liners?
Catalytic liners are specially coated panels on the side walls of the oven that absorb grease during cooking and oxidise it at normal cooking temperatures. They reduce the frequency and effort of manual oven cleaning but do not eliminate it entirely.
- Never use chemical oven cleaners on catalytic liners. Chemical cleaners destroy the catalytic coating permanently, rendering the liners ineffective. This damage cannot be reversed and the liners will need replacing.
- Wipe away loose debris gently. Use a damp cloth only, with no cleaning products, to remove any loose food particles from the liner surface. Do not scrub.
- Run the oven at a high temperature to burn off absorbed grease. Setting the oven to its highest temperature (around 220°C to 250°C) for 30 to 60 minutes helps the liners burn off absorbed grease. Do this regularly rather than waiting until the liners appear heavily soiled.
- Replace liners when they become saturated. Over time, catalytic liners lose their effectiveness as the coating becomes fully saturated. When grease begins to accumulate visibly on the liner surface despite running the oven at high temperatures, the liners need replacing. Replacement catalytic liners for most major oven brands are available through our appliance spare parts section.
How often should you clean an oven?
| Task | Recommended frequency |
|---|---|
| Wipe up spills immediately after cooking | After every use, while still slightly warm |
| Wipe door glass and exterior | Weekly |
| Full interior clean including racks | Every three months for average use |
| Full interior clean for heavy use households | Monthly or every six to eight weeks |
| Pyrolytic self-clean cycle | Every three to six months depending on use |
| Catalytic liner high-temperature burn-off | Monthly, or whenever grease build-up is visible |
| Door seal inspection and clean | Every three months |
The single most effective habit for reducing cleaning effort is wiping up spills promptly while the oven is still slightly warm. Fresh spills are vastly easier to remove than carbonised residue that has been baked on through subsequent uses.

Always ensure the oven is completely cool and switched off at the mains before cleaning. Never use water or cleaning products near electrical elements or gas burners. Chemical oven cleaners contain strong alkalis that can cause skin and eye irritation – always wear rubber gloves and work in a well-ventilated space. If your oven has a gas supply, never attempt to disassemble or clean around the gas burner assembly. If you notice damage to the door seal, cracks in the door glass, or any signs of electrical burning or unusual smells during use, stop using the oven and seek professional advice before cleaning it. See our DIY appliance repair safety guide for full guidance.
Is your oven not heating correctly or showing a fault?
If cleaning has not resolved a performance issue – or if your oven is not reaching the correct temperature, is producing error codes, or showing signs of a fault – our engineers can help. We also stock genuine oven spare parts including door seals, door glass, and catalytic liners for all major brands.
Frequently asked questions about cleaning an oven
What is the easiest way to clean an oven?
The easiest method for most people is to apply a proprietary oven cleaner gel or spray, leave it overnight, and wipe clean the following morning. This requires minimal scrubbing and produces good results on moderate soiling. For those who prefer a chemical-free approach, a thick paste of bicarbonate of soda and water left overnight works well and is safe for all conventional ovens. Pyrolytic ovens offer the least effort overall, reducing all residue to ash that simply wipes away.
Can I use bicarbonate of soda to clean my oven?
Yes. Bicarbonate of soda mixed with a small amount of water to form a thick paste is an effective and chemical-free alternative to proprietary oven cleaners. Apply it to the interior surfaces, leave for at least four hours or overnight, then wipe clean with a damp cloth. For stubborn areas, spraying white vinegar over the bicarbonate of soda paste once the soaking period is complete creates a fizzing reaction that helps lift remaining residue. Rinse thoroughly before using the oven for food.
How do I clean between the oven door glass panels?
Grease that has worked its way between the inner and outer panels of the oven door cannot be removed from either surface alone. Many ovens allow the door to be removed and partially disassembled to access the space between the panels. The method varies by manufacturer and model, so consult your oven’s manual before attempting this. If the door is not designed to be disassembled, an appliance engineer can advise on options or carry out the cleaning as part of a service visit.
Can I put oven racks in the dishwasher?
It depends on the rack material and your dishwasher. Chrome-plated oven racks can discolour or develop rust if repeatedly put through a dishwasher, particularly in hard water areas. Stainless steel racks are generally more tolerant of dishwasher cleaning. Soaking racks in warm water with washing-up liquid or biological washing powder overnight and scrubbing by hand typically produces better results and avoids any risk of damage. Check the oven manufacturer’s guidance for your specific racks before using the dishwasher.
How do I clean a fan oven without damaging the fan?
Apply cleaning products to the oven walls, base, and roof, but avoid spraying or applying paste directly onto the fan blade or fan cover. Wipe around the fan housing with a damp cloth and use an old toothbrush to clean around the edges of the fan cover. Do not attempt to remove the fan blade unless you are confident doing so, as the nut securing it is often reverse-threaded and incorrect removal can cause damage. If the fan cover itself needs cleaning, wipe it gently in place rather than removing it.
How often should I run a pyrolytic cleaning cycle?
For average household use, running a pyrolytic cycle every three to six months is typically sufficient. Using the oven at a high temperature to do a roast or similar will naturally keep light grease build-up under control between cycles. Wiping obvious spills away promptly after cooking also reduces how frequently a full pyrolytic cycle is needed. Running the cycle too frequently is not harmful to the oven but uses a significant amount of electricity, so balancing it against actual soiling levels makes practical sense.
Will cleaning my oven damage the catalytic liners?
It can, if the wrong products are used. Chemical oven cleaners destroy the catalytic coating permanently and cannot be reversed – once damaged, the liners no longer absorb grease and will need replacing. To clean a catalytic-lined oven safely, apply oven cleaner only to the floor, roof and door glass, keeping it well away from the side panels where the liners are fitted. Wipe the liners themselves with a damp cloth only, and rely on the high-temperature burn-off described above for grease removal. If you are unsure whether your oven has catalytic liners, check the manual or look for textured matt grey or beige panels on the side walls – smooth enamel walls are not catalytic.
0 Comments