Moving appliances – UK guide

Moving major appliances safely depends on three things: protecting the appliance internals during transit, allowing the appliance to settle properly at the new location before being switched on, and knowing what legally has to stay with the property if you are selling. Washing machines need transit bolts fitted (or risk catastrophic drum damage). Fridges and freezers need to stand upright for several hours after transport before being plugged back in. Tumble dryers, dishwashers, and ovens all have their own specific moving considerations. This guide covers every common UK appliance in turn, with the genuine engineering reasons behind each step rather than just a checklist. The number one cause of new washing machine damage in the UK is moving the machine without the transit bolts fitted, which is also the single least-known fact about moving appliances.
Before you move anything: the legal question
The first question when moving house is often not how to move the appliances but whether to move them at all. UK property law has clear default positions on what stays with a property at sale, and the answer affects which appliances need to be moved and which legally stay where they are.

Fixtures vs fittings
Under UK property law, “fixtures” are items attached to the property and presumed to stay at sale. “Fittings” are freestanding or easily removable items that the seller is presumed to take with them. The distinction is set out in case law and reinforced by the Law Society’s TA10 Fittings and Contents form, which most sales transactions use to explicitly list what is included and what is not.

Built-in and integrated appliances
Integrated ovens, integrated dishwashers, integrated fridge-freezers, and integrated washing machines are typically considered fixtures and are presumed to stay with the property unless the TA10 form specifies otherwise. The same applies to gas hobs, electric hobs, and extractor hoods built into the kitchen run. Removing these without agreement can lead to disputes after completion. See our recent guide on integrated vs freestanding appliances for the wider context on why integration affects this question.

Freestanding appliances
Freestanding washing machines, freestanding tumble dryers, freestanding fridges, microwaves, kettles, and small kitchen appliances are presumed to be fittings and go with the seller, unless the TA10 explicitly includes them in the sale. Buyers should always check the TA10 form before exchange to know what they are getting; sellers should make sure their intentions are reflected in writing.

The “always check” rule
Whatever the legal defaults, the practical answer is always to confirm in writing. Estate agents do not always volunteer the position, sellers occasionally misunderstand, and buyers regularly make assumptions that turn out to be wrong on completion day. A clear TA10 with each appliance explicitly listed or excluded prevents disputes entirely.

This guidance covers the typical UK position and is provided as general information only. It does not constitute legal advice. For specific property sale disputes, consult a qualified solicitor or your conveyancer.
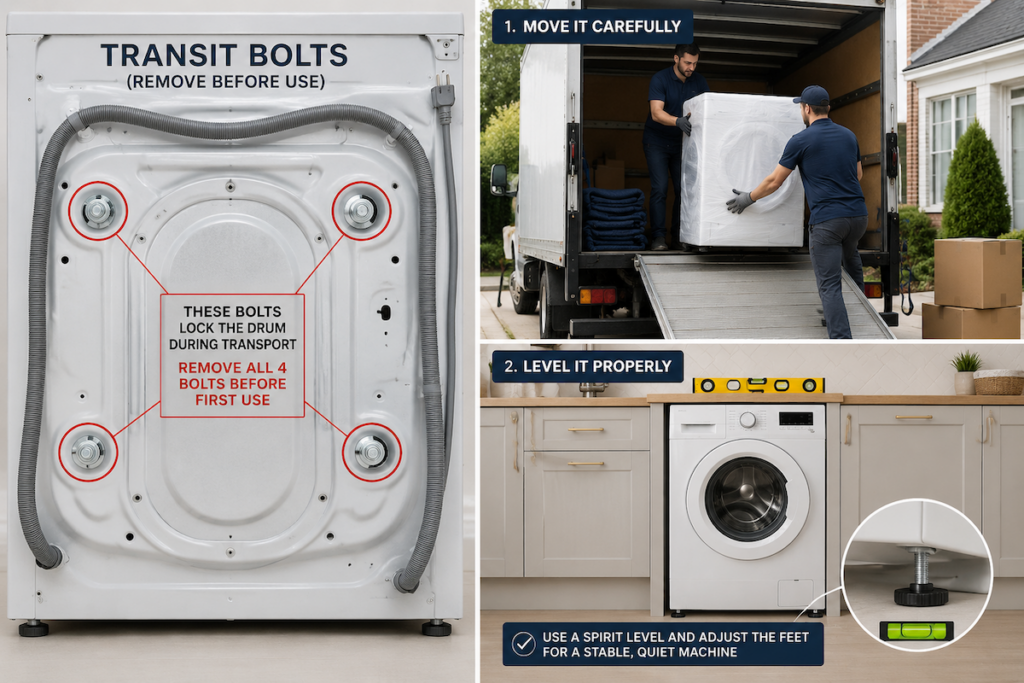
Washing machines: the transit bolts problem
The single most important fact about moving a washing machine is that it needs to have transit bolts fitted before it is moved. Most UK consumers have never heard of transit bolts. Most removal companies do not check for them. The result is that every year, large numbers of washing machines arrive at new properties with catastrophic internal damage that was entirely preventable.

What transit bolts actually do
Inside a washing machine, the drum is suspended on heavy springs and shock absorbers that allow it to move during the spin cycle. This suspension system is essential for normal operation but extremely vulnerable to damage during transport, when the drum can swing freely and crash into the outer tub on every bump or jolt. Transit bolts are large bolts (usually three or four of them) that screw through the back of the machine into the drum assembly, locking the drum rigidly in place so it cannot move during transport.
What happens without transit bolts
Moving a washing machine without transit bolts fitted typically causes one of three outcomes. Best case: the suspension and shock absorbers wear prematurely and the machine becomes noisy on spin within months. Middle case: the drum strikes the outer tub repeatedly during transit, causing dents, cracks, or balance damage that affects every wash from then on. Worst case: the drum suspension or the drum itself sustains structural damage that requires major repair (£200+) or write-off of the machine. Insurance claims for “broken in transit” damage often turn on whether transit bolts were fitted, with claims frequently rejected when they were not.

Finding the original transit bolts
Every new washing machine comes with transit bolts fitted when it arrives from the factory. The installer removes them before first use and is supposed to give them to the household to keep. In practice, they are often thrown away or lost within months. If you have moved house at any point in the machine’s life, the transit bolts may be in a drawer somewhere. If not, replacement transit bolts can be sourced through our spare parts service by model number, typically costing £15 to £40 for the set.

How to fit them
The transit bolts thread through holes in the rear panel of the washing machine, where they engage with brackets on the drum suspension. Each bolt locks the drum in one direction. Fitting is straightforward with the bolts in hand: align with the holes (usually visible as plastic-capped recesses on the back panel), thread in by hand, then tighten with a spanner. The machine should not be moved until all bolts are fully tightened. After arrival at the new property, the bolts come out before the machine is used. If they are left in, the machine vibrates wildly on the first spin and can damage itself catastrophically in seconds. See our piece on won’t drain after being moved for one of the common faults that appears after a poorly executed move.
Washing machines: the full disconnection routine
Once the transit bolt question is sorted, the rest of the washing machine disconnection routine is straightforward but worth doing in the right order to avoid water on the floor and damage to hoses.

Step 1: Run a final empty cycle and drain
Run a short hot or maintenance cycle with no clothes and no detergent. This empties any soapy residue from the drum and drains the machine. Once the cycle ends, pump out any remaining water through the drain filter (see our piece on how to drain a washing machine). Residual water in the machine adds weight, creates a leak risk during transit, and freezes in winter if the appliance is stored in an unheated van or garage.

Step 2: Turn off and unplug
Switch off at the wall socket and unplug the machine. If the machine has a separate isolator switch, turn that off too. Never disconnect hoses while the machine is still plugged in.

Step 3: Turn off the water supply
Behind or under the machine there will be one or two isolator valves on the water supply (cold fill only on most modern machines, hot and cold on some). Turn these clockwise to shut them off completely. If the isolators are missing or stiff, turn off the kitchen mains stopcock before going any further. Have a bowl and a few towels ready in case of residual water in the hoses.
Step 4: Disconnect the fill hose(s)
Unscrew the fill hose from the isolator valve (anti-clockwise). Have a bowl ready for residual water in the hose. The hose end can stay attached to the machine for transit. Wrap the disconnected end in a plastic bag and tape it to the back of the machine to keep it tidy.
Step 5: Disconnect the drain hose
Pull the drain hose out of the household waste pipe (or unscrew the dishwasher-style fitting if installed that way). Keep the end raised above the level of the machine until it is fully drained. Tape the drain hose to the back of the machine alongside the fill hose for transit.

Step 6: Fit the transit bolts
With the machine disconnected from water and power, locate the transit bolt holes on the back panel and fit all the bolts. If you have lost the originals, source replacements before the move; do not attempt to move the machine without them. This is the single most important step in the entire routine.

Step 7: Plan the lift
A typical washing machine weighs 70 to 90 kg, mostly because of the concrete or heavy plastic ballast weights inside it (see our piece on washing machine concrete weights for context). Always lift with two people minimum, use a sack trolley if available, and pull the machine out gently using the front legs as pivot points rather than dragging the body. Our piece on the best way to pull a washing machine out covers the routine in detail.
Can you move a washing machine on its side?
One of the most common questions about moving washing machines is whether they can be transported on their side in a car or small van rather than upright. The honest answer is “not ideally, but yes with the right precautions”.
Moving a washing machine on its side puts the entire weight of the drum suspension on one of the shock absorbers, which is not what the design intends. With transit bolts properly fitted, the drum cannot move and the damage risk is much lower, but laying the machine flat for an extended period can still stress the bearings, the shock absorbers, and the seals.
If a sideways transport is unavoidable (small car boot, lift restrictions, narrow staircase), the practical guidance is: only do it with transit bolts fitted, only lay the machine on its back rather than on its sides (the back panel is structurally stronger and supports the drum suspension better), pad the surface generously, and minimise the time the machine spends on its side. Once at the destination, stand the machine upright again immediately, then leave it upright for several hours before plugging in to allow any displaced lubricants and residual water to settle.
For longer journeys or higher-value machines, upright transport in a van remains the only properly safe option.
Fridges and freezers: the stand time problem
The single most important fact about moving a fridge or freezer is that the appliance must be left to stand upright at the destination for several hours before being plugged back in. Skipping this step is the single most common cause of post-move compressor failure on refrigeration appliances, and unlike washing machine transit bolt damage, the damage from plugging in too soon is often slow to show and difficult to diagnose.
Why stand time matters
Inside a fridge or freezer compressor is a small reservoir of lubricating oil and refrigerant. During normal operation, the compressor sits upright and the oil stays in the sump where it belongs. When the appliance is tipped over, laid on its side, or jolted significantly during transit, some of that oil migrates into the refrigerant lines where it is not supposed to be. If the appliance is plugged in straight away, the compressor pumps oil rather than refrigerant, which causes immediate damage and often a complete compressor failure within days or weeks. Standing time allows the oil to drain back into the sump under gravity before any current is applied.

How long to stand
The consensus engineering guidance is that the appliance should stand upright for the same number of hours it spent on its side or significantly tilted. If a fridge spent 30 minutes on its back in a van, allow at least 30 minutes upright before plugging in. If a fridge spent 4 hours on its side, allow 4 hours. For appliances transported upright with only minor jolting, a precautionary 2-hour stand is the standard safe minimum, though manufacturer guidance varies. American-style fridge-freezers and tall fridge-freezers transported on their sides (which is common because of doorway clearance) should always have a minimum of 4 hours’ upright stand, often longer.

The simple rule
If in doubt, stand the appliance overnight before plugging in. This is the universal safe answer that covers any reasonable transport scenario. The few hours of lost cooling time at the destination are insignificant compared to the cost of a compressor failure within the first month.
Fridges and freezers: the full disconnection routine
Fridges and freezers also have a sequence to follow before the move itself starts. Skipping any step typically causes a worse moving experience and sometimes lasting damage to the appliance.

Step 1: Empty the contents the day before
Eat down the food in the days leading up to the move, or transfer it to a friend’s fridge for the move day if needed. A moving van without temperature control will let food spoil. Frozen food can survive an hour or two in a well-insulated bag with ice packs but rarely longer. Trying to keep food cold during a move is more trouble than it is worth — better to plan around it.

Step 2: Defrost completely
The freezer must be defrosted before moving. Built-up ice represents significant additional weight, melts during transit, leaks water everywhere, and can lift loose ice that damages internal components when it shifts. Switch off the appliance at least 24 hours before the move, prop the door open with a towel underneath to catch meltwater, and allow all ice to melt naturally. Frost-free models defrost faster but still need overnight. See our existing piece on frosting up in fridge or freezer for the wider context on ice buildup.

Step 3: Clean the interior
Once defrosted and emptied, wipe out the interior thoroughly. Closing up a damp fridge or freezer for a multi-hour move with no airflow causes mould and smells that are difficult to eliminate later. Leave the doors slightly ajar overnight before the move if possible. Tape the doors closed before transit so they cannot swing open in the van, but use easily-removable masking tape rather than gaffer tape which leaves residue.
Step 4: Secure removable parts
Glass shelves, salad drawers, freezer baskets, and door storage all need to be either removed and packed separately, or secured in place with tape so they cannot slide and break during transit. Glass shelves are particularly vulnerable. The internal layout is rarely uniform between models, so making a quick phone photo of the original layout before disassembly makes the reset at the new property significantly easier.
Step 5: Disconnect the water supply (water dispenser models)
American-style fridge-freezers and any fridge with a water or ice dispenser have a separate water supply that needs disconnecting. Turn off the household isolator valve for the water line, then disconnect the supply pipe from the back of the appliance. Have towels ready for residual water. The supply pipe can usually be coiled and taped to the back of the appliance for transit.

Step 6: Measure doorways before the move
Larger fridge-freezers can be very tight through standard UK doorways, especially American-style and French-door models. Measure both the appliance and every doorway it must pass through (including the destination property) before the move day. If clearance is tight, the doors may need to come off temporarily. This is significantly easier to plan before the move than to discover at 4pm on completion day.
Tumble dryers, dishwashers, ovens, and other appliances
Most of the same principles apply to other major appliances, with each category having its own specific considerations.

Tumble dryers
Tumble dryers do not have transit bolts like washing machines, but they should still be handled upright wherever possible. Heat pump dryers are particularly sensitive because of the refrigerant system, which is essentially a small fridge mechanism. Heat pump dryers should be treated like fridges in transit: keep upright if possible, and if laid down, allow at least 4 hours of upright standing time before plugging back in. For wider dryer context see our heat pump vs vented vs condenser tumble dryer guide and the broader tumble dryers section.

Dishwashers
Dishwashers have a salt container, a rinse aid reservoir, and residual water in the sump that can leak during transit. Run a final empty cycle, drain the salt container if possible (or accept that some salt water will leak — it is harmless but messy), and tape the door closed for transit. The water inlet and waste hoses disconnect similarly to a washing machine. Dishwashers can usually be transported upright in a van without special handling, but the door is the weakest point and should be padded or strapped to prevent it swinging open.

Electric ovens, hobs, and cookers
Freestanding electric cookers are heavy (typically 60 to 90kg) but otherwise straightforward to disconnect: switch off at the cooker switch, unplug or disconnect the hardwired connection (electrician required for hardwired units), and lift. Hot plate elements and oven shelves should be removed and packed separately to prevent damage during transit. Glass oven doors are vulnerable to shock damage and benefit from blankets or bubble wrap around the door area.
Gas appliances (gas hobs, gas ovens, gas cookers)
Gas appliances must only be disconnected and reconnected by a Gas Safe registered engineer. This is not a recommendation. It is a legal requirement under UK gas safety law. Removing a gas appliance from one property and installing it in another requires a Gas Safe engineer at both ends. Attempting DIY disconnection of a gas appliance is illegal, dangerous, and invalidates household insurance. The Gas Emergency Helpline is 0800 111 999 if you smell gas or suspect a leak. Always check the engineer’s Gas Safe ID card before any work begins.

Microwaves, air fryers, and small appliances
Small appliances are straightforward — unplug, clean, and pack with the cord neatly wrapped. Microwaves should ideally have the glass turntable removed and packed separately to prevent damage. Air fryers, toasters, kettles, and similar can typically be packed in their original boxes if available, or in cardboard with bubble wrap. Stand mixers and other heavy small appliances need to be packed similarly to larger units because of their weight.
At the new property: setting up correctly
Arriving with the appliances intact is half the job. Getting them properly installed at the new property is the other half. The single most common installation errors are also the easiest to avoid with a few minutes of attention.
Remove washing machine transit bolts before first use
The single most common installation error after a move is leaving the transit bolts in the washing machine when it is first switched on. The result is severe vibration, loud banging, and potentially serious internal damage within seconds of the first spin cycle. Always check the back of the machine and remove all the bolts before plugging in. Keep them safely — you will need them for the next move.
Allow fridges and freezers to stand
As covered above, refrigeration appliances need to stand upright at the new property before being plugged in. Plug in too soon and you risk compressor damage. The simple rule is to leave overnight unless you are certain the appliance was transported entirely upright with minimal jolting.
Level the washing machine and dryer
A washing machine that is not level will vibrate excessively and walk across the floor during spin cycles. The front feet are usually adjustable: turn them anti-clockwise to extend, clockwise to retract, until the machine is solidly stable with all four feet on the floor and no rock when pushed at the corners. A small spirit level or a phone level app makes this faster. Failure to level properly is one of the single most common causes of washing machine vibration and noise complaints after a move. See our piece on raising a washing machine off the floor for related installation considerations.
Check hose connections for leaks
After reconnecting water supply hoses, turn the water back on slowly and watch the connections for leaks. A pinhole leak that goes unnoticed for the first few days can cause significant damage to flooring and cabinets before the first proper wash even starts. Hose seals can perish during long disconnected periods; replacement hoses are cheap and worth swapping in if there is any visible damage.
Check ventilation requirements
Fridges, freezers, tumble dryers, and heat pump appliances all need specific ventilation clearances around them to operate efficiently. Pushing the appliance flush against a wall or into a tight cabinet space without the manufacturer’s specified clearance leads to overheating, premature compressor wear on refrigeration, and reduced drying efficiency on dryers. The user manual specifies the required clearances; the most common are 5cm at the back and a few cm at the sides for most freestanding refrigeration appliances.

Run a test cycle on the washing machine
Before doing actual laundry, run a short empty cycle to confirm the machine fills, drains, and spins without leaks or unusual noises. If problems show up, they show up on the empty cycle and can be diagnosed without ruining a load of clothes. If the machine fails to drain on the first cycle, see our piece on won’t drain after being moved for the common causes.
What to take, what to leave, and disposing of what’s left
The final question for many moves is what to do with appliances that are too old, too damaged, or simply not worth the cost of transport. UK regulations and practical options vary depending on the appliance and its condition.

The WEEE regulations
Under the UK Waste Electrical and Electronic Equipment (WEEE) Regulations, retailers selling new appliances are required to offer take-back of the old appliance, either free of charge in-store or for a small delivery-related fee with a new appliance delivery. Most major retailers (Currys, AO, John Lewis, Argos) include take-back as standard when delivering a new appliance, often at no extra cost. This is the easiest disposal route if you are replacing the appliance at the new property.

Local council collection
UK local councils offer bulky waste collection services that cover large appliances. Pricing varies significantly by council, typically £15 to £40 per item. Booking is usually online. The council also operates household recycling centres (tip) where appliances can be dropped off free of charge, often with a designated WEEE area.

Selling working appliances
Working appliances that you are not taking can be sold via local marketplace platforms, donated to local charities, or given away on community Facebook groups. Even older washing machines and fridges have some residual value to people on tight budgets, and rehoming is more environmentally sensible than disposal. Be honest about age, condition, and any known faults to avoid disputes after collection.
Refrigeration appliances need special handling
Fridges and freezers contain refrigerant gases that must be removed under regulated conditions before scrapping. Never abandon a fridge or freezer, and never break one apart for parts. Use the retailer take-back or council collection route, both of which handle the refrigerant properly. Fly-tipping a fridge is a criminal offence under the Environmental Protection Act and carries significant fines.
The Whitegoods Help view
The honest position is that most appliance moving disasters are entirely preventable with knowledge that should be standard but mostly isn’t. Transit bolts on washing machines, stand time on fridges, defrosting freezers before transit, Gas Safe engineers for gas appliance disconnections — these are the basics that determine whether your appliances arrive at the new property in good condition or whether you spend the first weeks of your new home calling repair engineers.
The unfortunate reality is that the people most likely to know these things — appliance engineers and manufacturers — are not the people you usually talk to during a house move. Removal companies handle the lifting and transport but rarely warn about transit bolts or stand time. Estate agents handle the fixtures-and-fittings question but rarely volunteer that integrated appliances are presumed to stay. The buyer, the seller, and the household end up making decisions on incomplete information that has expensive consequences.
The cost of doing it right is small. Replacement transit bolts cost £15 to £40. Defrosting a freezer in advance costs nothing but time. Standing a fridge overnight costs only the inconvenience of slightly delayed cooling. A Gas Safe engineer for a hob disconnection costs £80 to £150. The cost of doing it wrong is much higher: a damaged washing machine that costs £200+ to repair or write off, a fridge with a failed compressor that needs replacement within a month, a £500 invoice for damage that was not covered by insurance because the appliance was not properly prepared for transit, or the time and cost of disputed fixtures after exchange.
Moving house is stressful enough without adding avoidable appliance disasters to the list. A few hours of preparation in the week before the move, and a few minutes of patience at the new property, is enough to make sure your appliances survive intact.
Need help with appliances at your new property?
Whether you are installing a moved appliance, sourcing replacement transit bolts, or dealing with a fault that has appeared since the move, our nationwide repair service and spare parts service can help. For gas appliance disconnections and reconnections, we work only with Gas Safe registered engineers.
Frequently asked questions about moving appliances
Can I move a washing machine without transit bolts?
Not safely. Moving a washing machine without transit bolts fitted typically causes drum suspension damage, premature shock absorber wear, or in the worst case, structural damage to the drum or outer tub. The damage from a poorly-moved machine can be expensive to repair (£200+) or render the appliance uneconomical to fix. Always fit transit bolts before moving. Replacement bolts are available through our spare parts service if the originals are lost.
How long should I leave a fridge to stand after moving it?
The consensus engineering guidance is to allow upright standing time at least equal to the time the appliance was on its side, with a minimum of 2 hours for any appliance that has been transported, even upright. If the appliance was tipped onto its back or side at any point, allow at least 4 hours, and ideally overnight, before plugging in. Plugging in too soon risks compressor damage from oil migration that has not yet drained back to the sump.
Can I move a washing machine on its side?
Not ideally, but possible with the right precautions. Always fit transit bolts first. Lay the machine on its back rather than on its sides (the back panel supports the drum better). Pad generously. Minimise time in this position. Once at the destination, stand the machine upright immediately and leave for several hours before plugging in. For longer journeys, upright transport in a van is the only properly safe option.
Do appliances stay with the property when I sell my house?
Under typical UK property law, integrated and built-in appliances (integrated ovens, integrated dishwashers, integrated fridge-freezers, hobs built into the kitchen run, extractor hoods) are presumed to be fixtures and stay with the property. Freestanding appliances are presumed to be fittings and go with the seller. The Law Society’s TA10 Fittings and Contents form, used by most UK property sales, should explicitly list what is included and what is not. Always confirm in writing before exchange. This is general guidance; for specific disputes consult a qualified solicitor or your conveyancer.
Where can I get replacement washing machine transit bolts?
Through our appliance spare parts service, which can identify the correct set for your specific make and model. Transit bolts are model-specific because the holes on the back of the machine vary in position and thread size. A complete set typically costs £15 to £40. Sourcing them a week or two before the move is the safe option; trying to find them on moving day is usually too late.
Can I disconnect a gas hob myself?
No. All gas appliance disconnection and reconnection in the UK must be carried out by a Gas Safe registered engineer. This is a legal requirement under UK gas safety law, not a recommendation. DIY gas work is illegal, dangerous, and invalidates household insurance. The Gas Emergency Helpline is 0800 111 999 if you smell gas. Always check the engineer’s Gas Safe ID card before any work begins.
How do I defrost a freezer before moving it?
Switch the freezer off at the wall at least 24 hours before the move (longer for heavily iced-up freezers). Empty all food. Place a towel underneath to catch meltwater, and prop the door open to allow airflow. Allow all ice to melt naturally — do not chip or scrape ice as this can damage the freezer walls or refrigerant lines. Wipe the interior dry once defrosted. Frost-free models defrost faster but should still be done overnight. See our piece on frosting up in fridge or freezer for the wider context.
What do I do with an old appliance I’m not taking with me?
Several options. Under UK WEEE regulations, most retailers will take back your old appliance when delivering a new one, often free of charge. UK local councils offer bulky waste collection (£15-£40 per item typically) and free drop-off at household recycling centres. Working appliances can be sold on local marketplace platforms or donated to charities. Fridges and freezers must always go through proper disposal routes because of their refrigerant gases — fly-tipping a fridge is a criminal offence carrying significant fines.
My washing machine won’t drain after being moved. What’s wrong?
This is one of the most common post-move faults and usually has a simple cause. The most likely issues are a kinked drain hose, an air-lock in the drain pump that needs clearing, debris in the pump filter that shifted during transit, or the drain hose end positioned incorrectly at the new property. See our dedicated piece on washing machine won’t drain after being moved for the diagnostic steps.
How much does it cost to have a removal company move appliances?
Most major UK removal companies include appliances as part of a full household move at no additional itemised cost. Some specialist firms charge per item (£20 to £50 for major appliances) particularly for white goods that need extra care. Be aware that most removal companies will not fit transit bolts for you, will not provide stand-time advice, and will not disconnect gas appliances. The combined cost of getting a few things wrong typically exceeds the saving from skipping a Gas Safe engineer or buying replacement transit bolts.
0 Comments