Buy Old Hotpoint Carbon brushes

Before ordering replacement carbon brushes, remove them from the motor first and confirm they are worn. If they match the appearance of the brushes shown here – same type and same colour – they will fit. Do not order based on model number alone, as some later Hotpoint machines have a different motor type despite sharing the same model range.
This page covers two types of carbon brush used in older Hotpoint and Creda washing machines – the white type (part 1600474) and the older black type (part 161460). Both were among the most commonly replaced spare parts on these machines.
White Carbon Brushes – Part Number 1600474

Hotpoint white carbon brushes – part 1600474
These carbon brushes were introduced for 1200 and 1400 spin Hotpoint washing machines before becoming the standard brush across the full Hotpoint range. They are slightly thicker than the older black type.

Some later Hotpoint machines use a different motor type. A model number may appear in the list below but the brushes will not fit if the motor is different. Always remove the brushes from the motor first and compare them visually to the picture above before ordering. If they look the same and are the same colour, they will fit. See: Hotpoint and Creda FHP carbon brushes for the later motor type.
Models These Brushes Fit (1600474)
95 series (all models beginning with 95) – 9900 – 9901 – 9920 – 9924 – 9934 – 95840 – 95842 – WM11 – WM12 – WM13 – WM14 – WM19 – WM20 – WM21 – WM22 – WM23 – WM24 – WM25 – WM26 – WM29 – WM31 – WM32 – WM34 – WM35 – WM38 – WM41 – WM63 – WM64
These brushes fit more models than listed. If a model is not shown, compare the brushes removed from the motor to the picture above. If they match in appearance and colour, they will fit.
Black Carbon Brushes – Part Number 161460
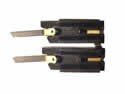
Old Hotpoint black carbon brushes – part 161460. Note: these may now be obsolete.
These were among the most commonly replaced spare parts ever used on Hotpoint washing machines. They tend to wear out faster than most other carbon brush types. As Hotpoint and Creda are now owned and manufactured by the same company, many Creda motors use these same brushes.
These brushes fit Hotpoint motors from the 1970s up to approximately 2002. Later WMA washing machines use different brushes.
Both types are very similar other than the colour of the brush holders and the quality of the carbon material inside. Some model numbers appear in both lists. Always try to use the same colour type as the original brushes removed from the motor.
Models These Brushes Fit (161460)
1535 – 1545 – 1850 – 95 series (all models beginning with 95) – 9900 – 9901 – 9920 – 9924 – 9934 – 17028 – 17040 – 18831 – 18840 – 18861 – 18870 – 18871 – 18880 – 18881 – 18580 – 18680 – 18780 – 18871 – 18872 – 18873 – 18880 – 95130 – 95132 – 95360 – 95362 – 95450 – 95452 – 95470 – 95472 – 95490 – 95492
These brushes fit more models than listed. If a model is not shown, compare the removed brushes to the picture above. If they match in appearance and colour, they will fit. The only other brushes with a similar appearance are the white type listed above.
Buy Hotpoint carbon brushes
Frequently Asked Questions
How do I know which carbon brushes to buy for my Hotpoint washing machine?
Remove the carbon brushes from the motor first and compare them to the pictures on this page. If they match the white type (part 1600474) in appearance and colour, order the white type. If they match the older black type (part 161460), order those. Do not rely on model number alone – some later machines have a different motor type even when the model number appears in these lists.
What is the difference between the black and white Hotpoint carbon brushes?
The main differences are the colour of the brush holders and the quality of the carbon material inside. The white type (1600474) is slightly thicker and was introduced for higher-spin machines before becoming the standard. Both types fit some of the same models. Always replace with the same colour type as the originals removed from the motor.
My model number is listed but the brushes don’t look the same – what should I do?
Some later Hotpoint machines were fitted with a different motor type (FHP motor) despite sharing model numbers with earlier machines. If the brushes removed from the motor do not look like either type shown here, the machine likely has the later FHP motor. See: Hotpoint and Creda FHP carbon brushes.
Buy Hotpoint & Creda FHP carbon brushes
If the motor in the machine is the FHP type shown in the photo below, use these brushes. If the machine has the older, smaller motor, see the older Hotpoint and Creda carbon brushes page instead. Always remove and compare the old brushes before ordering.
Later Hotpoint washing machines were fitted with the FHP motor. The carbon brushes for this motor are different from the older type – larger, thicker, and more hard-wearing. This page covers which models use FHP brushes and where to buy them.
The FHP Motor and Brushes
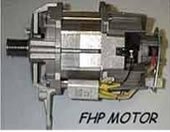
The FHP motor fitted to later Hotpoint washing machines
The FHP brushes are considerably larger and more durable than the older thin brushes used in earlier Hotpoint and Creda machines. If the motor in the machine matches the one shown above, these are the correct brushes to order.
Ready to buy?
Models the FHP Brushes Fit
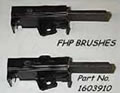
Hotpoint / Creda FHP carbon brushes
Electra, English Electric, Gala and Hotpoint Models
Electra 17054E – Electra 17055 – Electra 17055E – Electra 17056 – Electra 17057E – Electra 17058E – Electra 17059E – Electra 17340E – Electra 17342E – English Electric EE100A – English Electric EE100WD – English Electric EE120A – English Electric EE80A – Gala 1019P – Gala 1025A – Gala 1025P – Gala 1025W – Gala 1051A – Gala 1051P – Gala 1051W – Gala 1061N – Gala 1061P – Gala 1063N – Gala 1063P – Gala 1151A – Gala 1151P – Gala 1151W – Gala 1161N – Gala 1161P – Gala 1162N – Gala 1162P – Hotpoint 1019P – Hotpoint 1025A – Hotpoint 1025P – Hotpoint 1025W – Hotpoint 1051A – Hotpoint 1051P – Hotpoint 1051W – Hotpoint 1061N – Hotpoint 1061P – Hotpoint 1063N – Hotpoint 1063P – Hotpoint 1151A – Hotpoint 1151P – Hotpoint 1151W – Hotpoint 1161A – Hotpoint 1161P – Hotpoint 1161W – Hotpoint 17054E – Hotpoint 17055
Creda Models
Creda 17072E – Creda 17076 – Creda 17078 – Creda 17079 – Creda 17080 – Creda 17081 – Creda 17083E – Creda 17084E – Creda 17085 – Creda 17086 – Creda 17087 – Creda 17088G – Creda 17096E – Creda 17098E – Creda 17110 – Creda 17111 – Creda 17112E – Creda 17112G – Creda 17113G – Creda 17113X – Creda 17120 – Creda 17121E – Creda 17176 – Creda 17182E – Creda 17184E – Creda 17185E – Creda 17186E – Creda 17187E – Creda 17343E – Creda 17345 – Creda 17345E – Creda 17346X – Creda 17390E – Creda 47305 – Creda 47306 – Creda 47308 – Creda CWA252 – Creda CWA262 – Creda W100FW – Creda W1200 – Creda W120FW – Creda W120VW – Creda W200FW/SC – Creda W220VW/SC – Creda WD1200 – Creda WMA10PE – Creda WMA30PE – Creda WMA31PE – Creda WMA32PE – Creda WMA33PE
Frequently Asked Questions
How do I know if my Hotpoint has the FHP motor?
Compare the motor in the machine to the photo at the top of this page. The FHP motor is a specific design used in later Hotpoint and Creda machines. If the motor matches the photo and the brushes are larger than the old thin type, these are the correct brushes. If the motor looks different, see the older Hotpoint and Creda brushes page.
Are FHP brushes better than the old Hotpoint brushes?
Yes – the FHP brushes are significantly larger and more hard-wearing than the older thin brushes used in earlier machines. The original Hotpoint brushes were known for wearing out relatively quickly. The FHP type has a longer service life.
Genuine washing machine spare parts
Non-genuine “pattern” parts are legal, often cheaper, and sometimes nearly as good as the original – but quality varies considerably. If a part is advertised as “to fit”, “suitable for”, or “equivalent”, it is not a genuine manufacturer part. For critical components such as carbon brushes and drum bearing seals, genuine parts are strongly recommended.
Not all spare parts sold for washing machines and other appliances are genuine manufacturer parts. Understanding the difference between genuine and non-genuine parts helps avoid wasting money on inferior copies that can fail early or, in some cases, cause further damage.
What Are Non-Genuine Spare Parts?
Non-genuine spare parts – often called “pattern” parts – are made by independent companies rather than the original appliance manufacturer. They are legal products, not counterfeits, and exist because popular parts attract competition. Manufacturers either tolerate this or have limited ability to prevent it.
Pattern parts are invariably cheaper than genuine parts, sometimes significantly so. This makes them attractive to both consumers buying parts directly and to engineers fitting them during repairs.
Are Non-Genuine Parts Always Inferior?
Quality varies considerably. In principle, a company copying a part and selling it cheaper has no commercial incentive to match or exceed the original quality – the goal is to undercut the price. In practice, however, some pattern parts are close to the original in quality, and some are even reputed to be made by the same component suppliers that supply the original manufacturer.
At the same time, many genuine parts from major manufacturers have themselves declined in quality over the years. Some pattern parts are poor copies, particularly carbon brushes. Others are perfectly adequate replacements for less critical components. The picture is genuinely mixed.
If in doubt, buying the genuine part is the only way to be certain of what is being fitted. Where a genuine part is available and the cost difference is not prohibitive, it is the safer choice – particularly for components that are difficult to access or that protect other expensive parts.
How to Tell If a Spare Part Is Genuine
Genuine parts will typically carry the manufacturer’s own branding or logo on the packaging. The part number on a genuine part tends to be a long numeric reference with no obvious meaning – manufacturers do not need to hint at what a part is because they are the manufacturer.
Non-genuine parts often use descriptive part numbers or packaging that signals they are not original. Signs to watch for include:
- Descriptions such as “to fit”, “will suit”, “equivalent”, or “suitable for” on the listing or packaging
- Part numbers beginning with abbreviated descriptions such as Pmp (pump), Cbs (carbon brushes), or similar
- Part numbers beginning with abbreviated brand references such as Hpt or HP (Hotpoint) or WP (Whirlpool) – genuine manufacturers use their own internal numbering and do not need to reference themselves in the part number
Why Are Non-Genuine Parts Commonly Used?
The lower cost makes pattern parts commercially attractive. For engineers carrying out repairs, using cheaper parts increases the profit margin on a job. In some cases the saving is passed on to reduce the repair cost to the customer – though customers should ideally be given a choice between genuine and pattern parts when both are available.
Many genuine parts are considerably overpriced relative to their production cost, which makes pattern alternatives genuinely competitive on value in some cases.
Which Parts Should Always Be Genuine?
For some components the risk of using a pattern part is higher than for others. Parts where non-genuine quality is most likely to cause problems include:
- Carbon brushes – pattern carbon brushes have a poor reputation for quality and can wear out very quickly, or cause motor damage if they fail unexpectedly inside the motor housing.
- Drum bearing seals – a failed bearing seal allows water into the drum bearings, which can write off an otherwise repairable machine. A cheap seal that fails early can turn a straightforward repair into a very expensive one.
For less critical components – such as door handles, knobs, or cosmetic trim – a pattern part may be perfectly acceptable.
Looking for spare parts?
Frequently Asked Questions
Are non-genuine spare parts legal?
Yes. Pattern parts are made by legitimate independent companies and are not counterfeits. Appliance manufacturers either tolerate them or have limited means to prevent them. They are legal to buy, sell, and fit – but quality varies and they are not the same as manufacturer-genuine parts.
How do I know if a spare part is genuine?
Genuine parts carry the manufacturer’s branding and use long numeric part numbers with no obvious meaning. Non-genuine parts often use descriptions such as “to fit”, “suitable for”, or “equivalent”, and may have part numbers with abbreviated references to what the part is (such as Pmp for pump) or abbreviated brand names (such as Hpt for Hotpoint). If in doubt, buy directly from the manufacturer or a supplier that explicitly states parts are genuine.
Which spare parts should always be genuine?
Carbon brushes and drum bearing seals are the two components where using a non-genuine part carries the most risk. Poor quality carbon brushes can wear out rapidly or fail in ways that damage the motor. A failed drum bearing seal can allow water into the bearings, potentially requiring a complete drum replacement. For these components, the cost saving of a pattern part is rarely worth the risk.
Washing Machine Pump Filter
The pump filter is usually found at the front bottom of the washing machine – look for a square or round access flap on the lower fascia, left or right side. Always drain any remaining water before opening it. The filter unscrews anti-clockwise. If the machine is stuck full of water, see our guide on how to drain a washing machine first.
Most modern washing machines have a pump filter designed to catch lint, coins, and small objects before they reach and jam the pump impeller. Cleaning it regularly – and knowing how to access it – is one of the most useful maintenance tasks an owner can carry out.
Where Is the Pump Filter?
On most machines the filter is behind an access flap at the front, positioned low down on the left or right side. It is usually obvious – a square or round panel that clips or screws open. Some machines have a small retractable drain hose alongside the filter, which allows water to be drained into a bowl before the filter is removed.
If there is no obvious access panel, check the instruction manual for your machine. If you do not have the manual, download a copy from our appliance instruction book resource. If the manual makes no mention of a pump filter, the machine may not have one – see the section at the bottom of this guide.
Filter Behind the Kick-Strip
On some machines the filter is hidden behind the kick-strip – the lower panel that runs across the front of the machine at floor level. If there is no obvious filter panel but the kick-strip appears to be built up rather than a thin cosmetic strip, the filter may be behind it.
Kick-strips are typically held in place by three or four clips along the top edge and can be brittle. To remove one, gently work a flat-bladed screwdriver between the top edge of the strip and the cabinet, levering forward carefully while pulling the strip towards you. Do not force it – check first whether it might be screwed in from the bottom rather than clipped at the top.
Plastic kick-strips become brittle with age and often crack if levered too aggressively. Work slowly and gently, feeling for any resistance that suggests a fixings point before applying more force.
Hidden Filters in the Sump Hose
Some older Hotpoint, Indesit, Candy, and Hoover models had the filter hidden inside the sump hose – the hose running from the base of the drum to the pump – rather than in an accessible front panel. When blocked, this type of filter is inaccessible without removing the sump hose, which on most machines requires an engineer. If you have an older machine from one of these brands and cannot locate any external filter, this may be the reason.
Draining Before Removing the Filter
If the machine has water in the drum, it must be drained before the filter is removed – otherwise water will flood out when the filter is opened. If the machine has a small drain hose next to the filter, pull this out and empty it into a bowl or towel before unscrewing the filter itself.
If there is no drain hose and the machine is full of water, see the draining section in our guide on washing machine won’t drain water before proceeding.
Do not lay the machine on its side to access anything while it still has water inside. Water can seep onto electrical components. If access from underneath is needed, have a second person tip the machine back and hold it at an angle while remaining upright.
How to Remove and Clean the Filter
-
Place a large towel or shallow tray under the filter access area to catch any residual water.
-
If a small drain hose is present, pull it out and drain it into a bowl. Replace it in its clip before unscrewing the filter.
-
Turn the filter anti-clockwise. Some filters unscrew completely; others only turn a quarter turn before pulling straight out.
-
Remove any debris – lint, coins, buttons, or other objects – and rinse the filter under running water.
-
Shine a torch into the pump housing and check for any object that may have passed through the filter and jammed the impeller. Try turning the impeller gently with a finger or screwdriver – it should rotate relatively freely, though some have a slight magnetic resistance that causes them to jump in steps rather than rotating smoothly.
-
Refit the filter securely, turning clockwise until it is firmly seated. Run a short cycle and check around the filter for any leaks.
If the filter area leaks after refitting, the filter seal may be damaged or not seated correctly. See our guide on cleaned pump filter now it leaks.
Pump Filter Stuck and Won’t Unscrew
If the filter is jammed and will not turn, the most likely cause is a bra underwire or other obstruction that has become tangled around it, locking it in place. Forcing the filter in this situation risks breaking it.
The best approach is to remove the main sump hose – the large black hose that leads into the pump from the drum – and retrieve the obstruction from there. Once the obstruction is removed, the filter can usually be unscrewed normally.
Testing the Impeller Without the Filter
With the filter removed, the machine can be put onto a drain or spin programme to check whether the impeller is turning. Shine a torch into the filter housing while the machine is running to observe whether the impeller is revolving. Note that with the filter removed, any water added to the machine will run straight out onto the floor – only run a dry drum check or use the drain programme only, not a wash cycle.
Machine With No Pump Filter
Some machines – particularly older models – have no accessible pump filter. If yours has no filter, any blockage will be located in the sump hose, inside the pump body itself, or in the drain hose. Common causes are coins, screws, rubber bands, and bra wire reaching the impeller directly. See our guide on pump running but not draining for diagnostic steps in this situation.
Need a Repair or Replacement Part?
If cleaning the filter does not resolve the drain fault, the pump itself may need replacing.
Related Guides
 Washing Machine Won’t Drain Water
The main drain fault guide covering all common causes – including how to drain a machine stuck full of water.
 Cleaned Pump Filter – Now It Leaks
What to do if the filter area develops a leak after cleaning and refitting.
 Pump Running But Still Not Draining
Less obvious causes when the pump is running and the filter is clear but the machine still won’t drain.
 Washing Machine Pump Guide
How the drain pump works, how to tell if it has failed, and what replacing one involves.
Frequently Asked Questions
Where is the pump filter on a washing machine?
Most machines have the filter behind an access flap at the front, positioned low down on the left or right side. If there is no obvious flap, check behind the kick-strip at the base of the machine – it may be hidden there. The instruction manual will confirm whether your machine has a filter and where it is located.
How do I remove the pump filter without flooding the floor?
Place a large towel or shallow tray under the filter area before opening it. If the machine has a small drain hose next to the filter, pull it out and empty it into a bowl first. If the drum still has a significant amount of water, drain it via the drain hose or by putting the machine on a spin programme before removing the filter.
Which way does the pump filter unscrew?
Anti-clockwise. Some filters unscrew until they pull free; others only rotate a quarter turn and then pull straight out. Do not force it – if it will not turn, there may be an obstruction such as a bra underwire tangled around it that is preventing rotation.
What if the pump filter is stuck and won’t move?
The most likely cause is a bra underwire or similar object tangled around the filter. Remove the main sump hose that leads into the pump and retrieve the obstruction from there. Once the obstruction is cleared, the filter should unscrew normally.
How often should the pump filter be cleaned?
Most manufacturers recommend cleaning the pump filter every one to three months, or whenever the machine develops a drain fault or takes longer than usual to empty. Households that wash pet bedding, heavily soiled items, or items that shed a lot of fibre should clean it more frequently.
Washing Machine Pump
The washing machine drain pump is a simple mains-voltage induction motor with an impeller. Most pump faults are caused by obstructions jamming the impeller rather than the pump itself failing. A blocked or jammed pump can often be cleared without replacement – but a leaking pump, or one with failed bearings or an open circuit coil, must be replaced.

The pump runs on mains voltage. Never test or work on any pump connections with the machine plugged in. Always unplug before accessing any internal component. See our DIY repair safety guide and DIY repair warnings before starting.
Understanding how a washing machine pump works makes it much easier to diagnose pump-related faults – and to know when a blockage can be cleared versus when the pump itself needs replacing.
How Does a Washing Machine Pump Work?

Mains voltage
The pump is powered directly from mains voltage. It is not speed-controlled – it either runs at full speed or does not run at all.

Impeller creates a vortex
When power is applied, the motor spins an impeller inside the pump chamber. The rotating impeller generates a vortex that forces water out through the drain hose.

Two-wire connection
The pump has a live and neutral wire. It does not matter which way round they connect. Some pumps also require a separate earth connection – see below.
No serviceable parts
The pump is a sealed unit with no repairable internal components. If the motor fails, the whole pump must be replaced.
Does the Pump Need Earthing?
Plastic housing – needs earth wirePumps with plastic brackets and housings are not self-earthing. A separate earth connection is required via the green and yellow earth wire, which attaches to a metal tab on the pump body.
 Double insulated – no earth needed
Some pumps are double insulated and do not require a separate earth wire. There will be no earth connection tab on the pump body. Check the pump markings or the machine’s wiring diagram to confirm.
What Can Go Wrong With a Pump?
| Fault | Key Symptom | Action |
|---|---|---|
| Obstruction | Humming noise on spin, pump runs but no water moves | Check filter and impeller – often clearable |
| Open circuit coil | Pump completely silent, may also stop filling | Test continuity – replace if failed |
| Leaking pump | Water dripping from pump body or seals | Replace – seals not available separately |
| Noisy pump | Grinding or grating during drain or spin | Check for obstruction first, replace if bearings |
Obstruction: The Most Common Cause
By far the most common pump problem is an obstruction – something preventing the impeller from spinning freely, or blocking water flow into or out of the pump. Coins, buttons, bra wire fragments, rubber bands, and small items of clothing are the most frequent culprits.
A humming noise when the machine starts a spin cycle – before the drum motor runs – is the classic symptom of a jammed pump. The motor is energised and trying to turn, but the impeller is blocked. Some obstructions do not prevent the impeller spinning but restrict water flow; in these cases the impeller turns but water cannot pump out fast enough. Start with the filter: see our guide on how to find and clean the pump filter.
Open Circuit Stator Coil
If the field coil fails and goes open circuit, the pump is completely silent when it should run. This is relatively rare. A less obvious consequence is that the machine may also stop filling – on some machines the pump shares a neutral wire with the water inlet valves, so a broken pump circuit disrupts the valves at the same time.
Test with a multimeter by measuring continuity across the two supply connections, with the machine unplugged.
Leaking Pump
Pumps can develop leaks from their seals or housing. A leaking pump may function for a period before seizing due to corrosion. Pump seals are not available as separate parts – a leaking pump must be replaced as a complete unit.
Noisy Pump
A grinding or grating noise during drain or spin most commonly indicates a small obstruction – grit, bra wire, or a button – caught inside the pump chamber and being struck by the rotating impeller. The noise may be constant or intermittent. If no obstruction is found, bearing failure is the next likely cause. A pump with failed bearings must be replaced.
Can a Pump Be Repaired?
 Can be cleared or fixed
- Impeller jammed by obstruction
- Loose or corroded electrical connection
- Blocked filter (replaced separately where available)
 Pump must be replaced
- Open circuit stator coil
- Failed bearings
- Cracked or leaking pump housing
- Impeller broken from shaft
Checks to Run Before Replacing
-
Check all electrical connections to the pump for corrosion or loose fit – with machine unplugged -
Inspect the impeller for obstructions and confirm it turns freely by hand -
Test continuity of the stator coil across the two supply terminals with a multimeter -
Check for visible cracks, leaks, or corrosion damage on the pump body
If the machine is full of water and the pump will not run, see our guide on washing machine won’t drain water. If the pump runs but still does not drain, see our guide on pump running but not draining.
Need a Pump Replacement or a Repair?
If the pump needs replacing or the fault is beyond DIY diagnosis, Whitegoods Help can help.
Related Guides
Washing Machine Won’t Drain WaterThe main drain fault guide – including how to drain a machine stuck full of water and all common causes.
Washing Machine Pump FilterHow to find, access, and clean the pump filter – the first step in any drain fault investigation.
Pump Running But Still Not DrainingWhat to check when the pump is running, the filter is clear, but water still won’t pump out.
3 Good Pre-Repair TipsEssential checks to carry out before booking an engineer or ordering parts.
Frequently Asked Questions
How does a washing machine pump work?
The pump is a simple mains-voltage induction motor. When power is supplied, the motor spins an impeller that creates a vortex forcing water out through the drain hose. There are no speed controls – the pump either runs at full speed or does not run at all.
What causes a washing machine pump to hum but not drain?
A humming pump that does not move water is typically jammed by an obstruction. The motor is energised and trying to turn, but the impeller cannot rotate. Common culprits are coins, bra wire, rubber bands, or buttons that have passed through the filter. Check the impeller for obstructions with the machine unplugged.
Can a washing machine pump be repaired rather than replaced?
In most cases, no. UK washing machine pumps have no serviceable internal parts. A failed motor coil, seized bearing, or cracked housing means the whole pump unit must be replaced. The only exception is where the pump filter is sold as a separate component.
Why does my washing machine stop filling when the pump has a fault?
On some washing machines, the pump shares a neutral wire with the water inlet valves. If the pump develops an open circuit fault, the shared neutral is broken, which also prevents the valves from opening. Both the pump and the water inlet appear to have failed simultaneously, even though only the pump circuit is at fault.
Does a noisy pump need to be replaced?
Not necessarily. Grinding or grating noise is most commonly caused by a small obstruction being struck by the rotating impeller. Always check and clear the pump first. If no obstruction is found and noise persists, bearing failure is likely – in which case the pump must be replaced.