
Appliance stuck behind a tiled floor

The key to getting a stuck appliance over tiles is to lower the feet as much as possible to reduce the appliance height, giving enough clearance to lift it over the tile edge. Work through the front feet first, then the back. If the back feet cannot be raised or removed, the options are limited to removing the worktop or, in worst cases, cutting channels in the flooring in front of the feet.

If you are planning a kitchen refit or have not yet tiled, read the companion guide before you start: fitting floor tiles in front of appliances. Prevention is considerably easier than the solutions on this page.
Why does this happen?
The situation typically occurs when floor tiles or cushion flooring are laid up to the front of an appliance that sits beneath a worktop. When the appliance needs to be pulled out – for a repair, replacement, or move – the tile edge acts as a barrier the feet cannot clear. The worktop above prevents lifting the appliance high enough to get over the tiles.
The amount of clearance available is usually very small, sometimes only a few millimetres. Every millimetre gained by lowering the feet is valuable.
Step 1: How do you lower the front feet?
Most appliances have adjustable feet. The goal is to screw the front feet in as far as possible to reduce the appliance’s height at the front, creating more room to tilt the front up and over the tile edge.
-
Take weight off the front feet. Lift the front of the appliance slightly to take its weight off the front feet. You may need a second person to help with this.
-
Check for locking nuts. Check whether there is a locking nut on each front foot. If so, loosen and wind it down the thread first to free the foot for adjustment.
-
Screw the feet in fully. Screw the front feet in as far as they will go, reducing the height of the appliance at the front.
-
Pull forward and tilt. Try pulling the appliance forward until the front feet meet the tile edge, then lifting the front slightly to clear the tiles. If successful, pull forward until the back feet reach the tile edge and repeat the process for the back.
Once the front feet are wound in, placing a folded towel underneath the front of the appliance can help it slide more easily and prevents scratching the flooring. This is particularly useful if the front feet have been removed entirely.
Step 2: How do you adjust the back feet?
If the front of the appliance clears the tiles but the back feet then hit the tile edge, the back feet also need to be lowered. This is where freestanding and built-in appliances differ significantly.
The back feet cannot normally be reached directly with the appliance in place. Try pulling the front of the appliance outward to create a slight tilt that lifts the back feet, then sliding the appliance forward. A towel under the front feet helps with sliding. This requires some force and often a second person.
Many built-in appliances have a rod mechanism that runs from front to back, allowing the rear feet to be adjusted from the front using a screwdriver. The adjustment screws are usually accessible from behind the kick strip at the bottom front of the appliance. See the photo below.
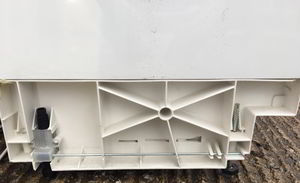
Side view of a built-in appliance (front on the right). The rod running from front to back adjusts the rear feet. The adjustment screws are accessible from behind the kick strip at the front.
Step 3: Can you remove the front feet entirely?
If screwing the front feet in as far as they will go still does not provide enough clearance, try removing the front feet completely. This gains a few extra millimetres of tilt, which can sometimes make the critical difference.
With the front feet removed, place a folded towel underneath the front of the appliance to protect the floor and help it slide. Pull the appliance forward while tilting the front upward to lift the back feet above the tile edge.
Step 4: Should you consider removing the worktop?
If the back feet still cannot clear the tiles despite all adjustments, the problem is the worktop preventing the necessary upward movement at the back. Removing the worktop would give the headroom needed.
In practice, worktops fitted over appliances are usually sealed and integrated and cannot easily be removed without damage. If a sink is fitted to the worktop, removal becomes even more complex. This option is worth considering but is not usually practical.
Before pulling a built-in appliance, check for any device fixed to the top of the appliance designed to clamp it against the underside of the worktop. These must be fully loosened or removed before attempting to pull the appliance out. Forgetting this is a common cause of an appliance that will not budge at all.
Last resort: cutting channels in the flooring
When all other options are exhausted and the worktop cannot be removed, the only remaining option is to cut away enough flooring in front of each foot to allow the appliance to come forward.

This is a last resort that should only be attempted when the appliance genuinely cannot be moved any other way. The result will require repair or concealment of the floor area afterwards.
The following describes a real case encountered by Whitegoods Help engineers. A dishwasher had tiles fitted right up to the front of it, with cushion floor on top of the old tiles. It was fitted beneath a worktop that had been installed too low, allowing the dishwasher to lift only approximately 5mm, not enough to clear the tiles. The worktop could not be removed because it had a sink fitted to it. With the front feet wound in as far as possible, the dishwasher was still completely stuck.
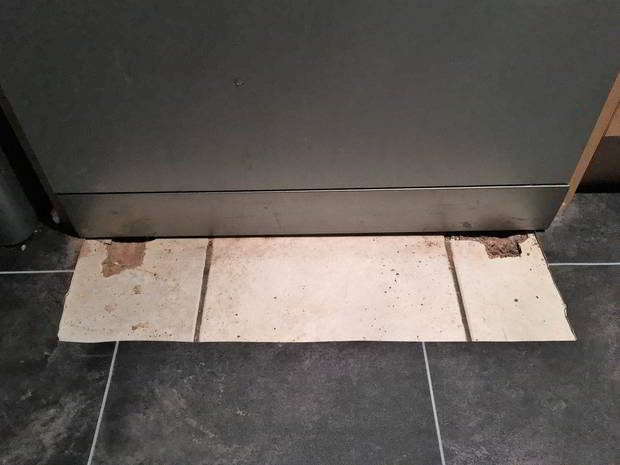
The result of cutting channels into the tiles and flooring in front of the two front feet. A strip of floor covering was cut away, then two channels were drilled and chiselled to allow the feet to come forward. The strip was laid back in place but the damage to the tiles was unavoidable.
The only solution was to cut a strip of the floor covering away, mark the position of the two front feet, and spend approximately 20 minutes drilling small holes and chiselling out two shallow channels in the tiles beneath to allow the feet to move forward. Once the feet had clearance, the dishwasher could be lifted over the remaining tiles and removed.
The floor covering strip was placed back over the channels afterwards, which concealed the worst of the damage. The tile damage itself remained visible. This outcome illustrates why fitting tiles in front of appliances is such a significant problem – the repair to the appliance cost far less time and money than the damage caused getting it out.
Related guides
For prevention before tiling, the right method for pulling a washing machine out, or to book an engineer to handle the job, see our related guides.
Frequently asked questions about appliances stuck behind tiles
Why is my appliance stuck behind the tiles?
When tiles or cushion flooring are fitted right up to the front of an appliance that sits beneath a worktop, the tile edge creates a barrier the feet cannot clear when the machine is pulled forward. The worktop above prevents the appliance being lifted high enough to get over the tiles. The tighter the worktop clearance, the harder the problem becomes to solve.
How do I lower the back feet on a built-in appliance?
Many built-in appliances have an adjustment rod that runs from the front of the machine to the back feet. The adjustment screws are usually accessible from behind the kick strip at the bottom front of the appliance and can be turned with a screwdriver. This allows the back feet to be raised or lowered without accessing the rear of the machine.
What if I cannot reach the back feet on a freestanding appliance?
The back feet on freestanding appliances cannot normally be reached directly. Try pulling the front of the appliance outward while tilting it slightly to lift the back feet above the tile edge, then sliding it forward. Placing a folded towel under the front of the appliance helps it slide without scratching. This usually requires two people.
Can removing the front feet help?
Yes, removing the front feet entirely rather than just screwing them in gives a few extra millimetres of tilt that can sometimes make the critical difference. With the front feet removed, place a folded towel underneath to protect the floor, then try pulling the appliance forward and tilting the front upward to lift the back feet clear of the tiles.
What if nothing works and the appliance is completely stuck?
If all foot adjustments have been exhausted and the worktop cannot be removed, the only remaining option is to cut channels in the flooring in front of the feet to allow them to move forward. This damages the flooring and should genuinely be a last resort. The channels can often be partially concealed by replacing the floor covering strip, but tile damage will be visible. This situation is entirely avoidable by not fitting tiles right up to appliances in the first place.
How do I check for a built-in clamping device before pulling the appliance?
Built-in appliances are often secured to the underside of the worktop by metal brackets that pass through the top of the appliance and screw into the worktop above. Open the door and look upward inside the appliance frame, or look down from the top edges of the appliance front, to spot the brackets. They typically have a single screw on each side. Loosen these fully before attempting to pull the appliance out. On dishwashers and integrated washing machines specifically, these brackets are nearly always present and forgetting them is one of the most common reasons people cannot move what should be a movable appliance.
Fitting floor tiles in front of appliances
Always extend new flooring fully underneath where a washing machine, dishwasher, or tumble dryer will stand – not just up to its front edge. When an appliance drops down behind a raised floor level, a worktop above can stop it being tilted and lifted back out. Sort this at installation, not when the appliance fails.
Laying floor tiles or laminate right up to the front of a washing machine, dishwasher, or tumble dryer – without extending the flooring underneath where the appliance stands – is one of the most common kitchen installation mistakes. The appliance fits perfectly when first pushed back into position. The problem only becomes apparent later, when the appliance has to come out for a repair or replacement, and by then both the flooring and the appliance can be at risk.
If an appliance is already trapped behind tiles and will not come out, see our companion guide on what to do when an appliance is stuck behind a tiled floor.
Why does flooring in front of appliances cause problems?
Stopping the new flooring at the front of the appliance space looks tidy and saves a bit of material – nobody can see underneath the appliance anyway. Many fitters and homeowners do this routinely, without realising what they are storing up.
The trouble only shows itself when the appliance has to come out – for a repair, a replacement, or a kitchen renovation. By then, lifting the flooring to free it may no longer be a simple job, especially where tiles have been cemented in place or are part of a finished, sealed floor.

How does this problem actually work?
When an appliance is pushed back into position under a worktop, it sits on the original floor level – behind whatever new flooring has been laid in front of it. It drops by the full height that new flooring adds, anywhere from 5mm for thin vinyl up to 20mm or more for ceramic tiles laid on adhesive.
To get the appliance out again, it has to be pulled forward and the front feet lifted over that tile edge. But the worktop above limits how far the appliance can be tilted – and because the appliance can only be lifted from the front, the back has to come up a lot further to clear even a small step.
If the floor has dropped by just 10mm, the back of the appliance may need to be raised 25-30mm or more for the front feet to clear the tile edge. With a low-fitted worktop above, there may simply not be enough clearance to achieve that.
Which flooring types pose the biggest risk?
Not every floor covering behaves the same way. Hard, thick materials are the worst, but even soft vinyl can cause trouble if it has been cut around the appliance space.
 Ceramic and porcelain tiles
The most problematic. Tiles are rigid, hard-edged, often 10-12mm thick on adhesive, and cannot be compressed. An appliance foot meeting a tile edge cannot flex over it. If there is too little headroom under the worktop, the appliance is physically locked in. Freeing it may mean chiselling channels through the tiles – causing permanent damage.
 Laminate and engineered wood
Laminate typically adds 8-12mm to floor height. Like tiles, it creates a firm edge the feet cannot clear without enough upward clearance. There is an extra hazard: if the back feet slide under the edge of floating laminate as the appliance is pulled out, the floor can lift and crack or pop apart at the locking joints.
 Cushion floor and vinyl
Even soft floor coverings cause problems. Though thinner than tiles, they still add height. More critically, if the back feet of an appliance catch under the edge of vinyl as it is pulled out, the flooring can rip – particularly where it has been fitted with a cut edge rather than a seam at the front of the appliance space.
New flooring laid over oldA particularly common scenario. New cushion floor or laminate is laid straight on top of existing tiles to save the work of removing them. The combined height of old tiles plus new flooring creates a step large enough to lock an appliance in completely – cases where both layers had to be cut into are not rare.
Already dealing with a stuck appliance?
If your washing machine or dishwasher will not come out for a repair, the companion guide walks through every option – from adjusting the feet down fully to cutting channels in the flooring as a last resort.
What is the right way to install flooring near appliances?
The correct approach is simple but takes a few minutes of extra effort at installation. Done once, it removes a problem that can otherwise cost flooring, time, and money years later.
-
Pull the appliance out fully before you start. Disconnect it from the power, water, and waste, then move it clear of the appliance space so you can lay flooring across the whole footprint. See the guide on the best way to pull a washing machine out for safe technique.
-
Extend the flooring all the way to the back wall. Run the new floor covering fully into the recess where the appliance will stand, not just up to the front edge. The appliance will then sit on the same level as the floor in front of it – no step, no trap.
-
Check worktop clearance before pushing the appliance back. With the appliance sitting on the new floor level, is there still a useful gap above it under the worktop? Push it in and try tilting the front upwards. If you can lift it a few centimetres, future removal will be straightforward.
-
Do not let worktops be fitted too low. Standard UK kitchen worktop height leaves enough clearance above a 850mm appliance. If the worktop is being fitted lower than standard – particularly over a specific built-in appliance space – measure carefully before the worktop is fixed in place.
-
If you must lay flooring without moving the appliance, at minimum keep the new flooring out from under the appliance feet and test that the appliance can still tilt and pull out over the new edge before the room is finished. Do this while the flooring is still removable.
How can you test clearance before it becomes a problem?
If there is a generous gap between the top of an appliance and the underside of the worktop, there may be enough room to manoeuvre even with new flooring in front. A one-minute check tells you whether you have a margin or a problem.
With the appliance in its installed position, lift the front up as far as the worktop allows and estimate how much the front feet can be raised. Compare that figure to the thickness of the flooring about to be laid.
-

Front feet can be raised 25mm, flooring is 10mm thick. Plenty of margin – the appliance will still come out over the new floor edge. -
Front feet can be raised 8mm, flooring is 12mm thick. Not enough headroom. Either extend the flooring underneath or rethink the floor build-up before it is fixed in place. -
Always allow extra margin for adjustable feet. Most appliance feet have 10-15mm of travel – useful for levelling but not enough to lift a machine clear of a thick tile step on its own.
What safety steps should you take before moving an appliance?
Pulling a washing machine, dishwasher, or tumble dryer out for any reason – including flooring work – means working around mains electricity and pressurised water. A few minutes of preparation prevents most accidents.

Unplug the appliance at the socket (or switch off and lock out the circuit if it is wired in) and turn off the water supply at the isolating valves before disturbing it. Never pull an appliance out while it is still powered or filled – electrical, gas, and plumbing connections can be damaged or pulled apart unexpectedly.
Heavy appliances should be moved with two people where possible. If you are unsure about disconnecting an appliance safely – particularly with gas cookers or hardwired installations – book a qualified engineer rather than risking damage or injury.
Need help with a faulty appliance or parts?
If you have discovered a fault while moving an appliance, or you need a replacement part to get it working again, our engineer network and spares directory can help.
Frequently asked questions
Do I really need to extend flooring under the appliance?
Yes, ideally. Stopping the flooring at the front of the appliance space means the appliance sits lower than the floor in front of it. When it needs to come out, the feet have to clear that step, and with a worktop above there may not be enough room. Extending flooring all the way underneath costs a small amount of extra material and avoids a potentially very difficult future problem.
Can cushion floor or vinyl really cause a problem – it seems thin?
Yes. Even though soft floor coverings are thinner than tiles, they still add height and create an edge. More importantly, the back feet of an appliance sliding under loose or cut-edge vinyl as it is pulled out can tear or rip the flooring. This is a common and entirely avoidable problem.
What if the worktop is already fitted – is it too late?
Not necessarily. If there is a large gap between the appliance and the worktop above, there may still be enough clearance to pull the appliance out over new flooring. Test it before laying the flooring by lifting the front of the appliance to see how high the feet can be raised, then compare that to the thickness of the flooring you are about to lay.
What happens if the appliance is stuck and cannot come out?
When the adjustable feet are wound down fully and the worktop cannot be removed, the only remaining option is usually to cut channels in the flooring in front of the feet to let the appliance move forward. This damages the flooring and is a last resort. The companion guide on what to do when an appliance is stuck behind a tiled floor covers every step.
What if a new floor is being laid over old tiles to save effort?
This is the most risky scenario. The combined height of existing tiles plus new flooring creates a step larger than either alone, and can make appliances very difficult to remove. If laying new flooring over old tiles in a kitchen with under-counter appliances, pull each appliance out first, lay flooring underneath, and check clearance carefully before refitting.
How much space should I leave around a washing machine?
Standard freestanding washing machines and dishwashers are 600mm wide, but most need a small clearance around the sides to fit and to allow airflow. Our guide on how much space a washing machine needs round the sides covers the minimum gaps and why a tight fit can cause problems later.
How To Wire A Washing Machine Plug
Brown goes to Live (L), Blue goes to Neutral (N), and Green/Yellow goes to Earth (E). The most common wiring mistake is cutting all three wires to the same length – each wire needs to be cut individually to reach its terminal, with the outer cable clamped under the cord grip, not the wires themselves.
Always ensure the appliance is unplugged before working on any part of the mains cable or plug. If you are not confident working with mains electrical connections, contact a qualified engineer. See our DIY repair safety guide before starting.
Fitting a new plug onto a washing machine mains cable is straightforward but must be done correctly. The most likely reason to need to do this is because the original moulded plug has been cut off to thread the cable through a small hole in a fitted kitchen cupboard.
Wire Colours: Where Each Wire Connects
| Wire Colour | Terminal | Label |
|---|---|---|
| Brown | Live | L |
| Blue | Neutral | N |
| Green / Yellow | Earth | E or ⏚ |
The Most Common Wiring Mistake
The most frequent error when fitting a plug is cutting all three wires to the same length before connecting them. Because the three terminals inside a 13A plug are not equidistant from the cable entry point, cutting all wires to the same length results in the brown wire – which has the shortest run to its terminal – being far too long.
This excess length forces the installer to loop the wire back into the plug, which in turn pushes the inner wires – rather than the outer cable jacket – under the cord grip. This is incorrect and potentially dangerous.
The purpose of the cord grip is to prevent the cable being pulled out of the plug. If the cord grip clamps the thin inner wires instead of the outer jacket, a tug on the cable can pull the wires free from their terminals, creating a shock or fire risk. The outer cable jacket must always be clamped under the cord grip.
How to Wire the Plug Correctly
-
Remove the plug cover and take note of where each terminal is positioned inside the plug and how far each is from the cable entry point.
-
Strip back the outer cable jacket to expose the three inner wires. At this stage all three wires will be the same length.
-
Hold the cable in position over the cord grip so that the outer jacket sits correctly under the grip when clamped. Do not cut anything yet.
-
With the cable held in position, measure and cut each wire individually to the length needed to reach its terminal – add approximately 5mm extra to each to ensure there is enough length to connect securely.
-
Strip approximately 6 to 7mm of insulation from the end of each wire.
-
Push the outer cable jacket under the cord grip and secure it. The grip must clamp the jacket, not the inner wires.
-
Connect each wire to its correct terminal – Brown to L, Blue to N, Green/Yellow to E – and tighten all terminal screws firmly.
-
Check that no bare copper is exposed outside a terminal, that no wires are trapped or pinched, and that the cord grip is clamped correctly on the outer jacket.
-
Refit the plug cover and tighten the cover screw.
The correct fuse rating for a washing machine is 13A. Do not fit a lower-rated fuse. If the original plug contained a different fuse, check the appliance data plate for the correct rating before fitting a replacement.
Need Help With a Washing Machine Electrical Fault?
If you suspect an electrical fault rather than a wiring issue, a qualified engineer should investigate before the appliance is used again.
Related Guides
 Washing Machine Fusing the Electrics
What to check if a washing machine is tripping the circuit breaker or blowing fuses – causes and what to do.
 Extension Leads for Washing Machines
Whether it is safe to use an extension lead with a washing machine, and what to look for if you need one.
 Should You Turn Appliances Off at the Socket?
Whether leaving washing machines and other white goods on standby is a safety or energy concern.
 DIY Repair Safety Guide
Essential safety rules before working on any appliance – electrical or otherwise.
Frequently Asked Questions
What colour wires go where in a UK plug?
Brown goes to the Live terminal (L), Blue goes to the Neutral terminal (N), and Green/Yellow goes to the Earth terminal (E or ⏚). These are the standard UK wire colours following the harmonised European colour coding introduced in 2004. Older appliances may have red (Live), black (Neutral), and green (Earth) – if working on old wiring, take extra care to identify wires correctly.
Why should the cord grip clamp the outer cable and not the wires?
The cord grip’s function is to prevent the cable from being pulled out of the plug under tension. If the grip clamps the thin inner wires rather than the tougher outer jacket, any pulling force is transferred directly to the wire terminals rather than the cable as a whole. This can pull wires free from their connections, creating a live exposed contact or a fire risk.
Why should I cut each wire to a different length?
Because the three terminals inside a 13A plug are at different distances from the cable entry point. If all wires are cut to the same length, the shortest-run wire (usually the brown Live) will be too long and cannot be connected neatly. Each wire should be cut individually to reach its terminal with a small amount of slack, not excess.
What fuse should I fit in a washing machine plug?
A 13A fuse is the correct rating for a washing machine. Do not fit a lower-rated fuse – washing machines draw significant current on startup and during heating, and an undersized fuse will blow unnecessarily. Check the appliance data plate if uncertain about the rated current draw.
Is it legal to wire my own plug?
Yes. Fitting a replacement plug on a domestic appliance in the UK is permitted work that does not require a qualified electrician. However, the work must be done correctly and safely. If you are not confident, contact a qualified engineer rather than risk a dangerous connection.
Don’t misconnect your washing machine or dishwasher to the plumbing
There are two separate drainage systems under most UK streets: one for waste water (toilets, sinks, appliances) which is treated; one for rainwater which runs untreated into rivers. Connecting appliance waste water to the rainwater system is a misconnection. Garages and outbuildings are particularly at risk because they are rarely connected to the sewerage system – making a misconnection easy to make accidentally.
If the waste water pipe from a washing machine or dishwasher is connected to the rainwater drainage system rather than the sewerage system, harmful detergent chemicals drain untreated into local rivers and streams. This is called a plumbing misconnection. It is illegal and it may have happened before you moved in – which does not change the current householder’s responsibility to correct it.
The Two Drainage Systems
Most UK properties are served by two entirely separate underground drainage systems that must never be connected to each other.
Sewerage system (foul water drain)
Receives waste water from toilets, baths, sinks, washing machines, and dishwashers. This water is pumped to a treatment works where harmful substances are removed before the treated water is discharged. The external pipe serving this system is typically a large 4-inch stack pipe on the outside wall of the property.
 Surface water drain (storm drain)
Receives only rainwater from roof guttering and external surfaces. This water runs untreated directly into local rivers and streams. It connects to grates at the base of fall pipes from the guttering. No waste water from appliances, sinks, or toilets should ever enter this system.
Why Misconnections Are Common
Misconnections often happen because the two drainage systems look similar from the outside and their connections can be physically close together. The problem is particularly common in garages and outbuildings, which are rarely connected to the sewerage system. Anyone installing a washing machine in a garage and connecting the drain hose to the nearest available pipe or grate risks connecting to the rainwater drain rather than the foul water system.
Outbuildings and garages are almost never connected to the sewerage system. Any grate or pipe in a garage floor or at the base of guttering fall pipes goes to the surface water drain. Connecting a washing machine waste pipe to any drainage point in a garage without verifying it connects to the foul water system is likely to result in a misconnection. See our guide on putting a washing machine in a garage for what to check before installing.
How to Check for a Misconnection
-
Locate the main 4-inch waste stack pipe on the outside of the property.
This is usually a large plastic pipe (typically white or grey) running vertically down an outside wall close to the bathroom or kitchen. All waste water from the property should ultimately connect to this pipe or to an approved grate directly beside it.
-
Check that no guttering fall pipes connect to the waste stack.
Rainwater from roof guttering must not discharge into the foul water system. If any fall pipe from the roof guttering connects to the main stack pipe, this is a misconnection in the other direction – rainwater overloading the sewerage system.
-
Trace the waste pipe from the washing machine or dishwasher.
Follow the drain hose or waste pipe from the appliance to where it exits the property. Confirm it connects to the main foul water stack pipe or to a grate that is itself connected to that system – not to a grate at the base of a guttering fall pipe.
-
Check grates near guttering fall pipes.
A grate at the base of a fall pipe receives rainwater from the roof. No appliance or sink pipe should connect to or discharge into this grate. If there is any appliance pipe near a guttering fall pipe grate, verify they are separate systems before assuming the connection is correct.
-
If in doubt, consult a plumber or the local water authority.
The local water authority may be able to advise or inspect drainage connections. A qualified plumber can trace the drainage routes and confirm whether any misconnection exists.
Consequences of a Misconnection

Environmental pollution
Waste water from washing machines and dishwashers contains detergents, bleaching agents, fabric softener, and other chemicals. When this water enters the surface water drain, it flows untreated directly into local rivers and streams, polluting the water and harming aquatic life.

Flash flooding risk
Appliance waste water discharged into the surface water system during heavy rain adds to the volume of water the storm drains must handle. Combined with heavy rainfall, this can contribute to surface water flooding in local streets.

Legal responsibility
A plumbing misconnection is illegal regardless of when it occurred or who made it. The current householder is legally responsible for ensuring drainage connections are correct. A misconnection discovered when selling a property may require correction before completion.
Installation Guides
Related Guides
 How to Connect an Appliance Properly
Correct drainage connections for washing machines and dishwashers – with diagrams and photos.
Washing Machine in a GarageWhy garages are particularly at risk of misconnection – and what to check before installing.
 How to Install a Drain Hose
Correct drain hose installation – height, routing, and connection to the waste system.
 How to Install a Washing Machine
Full installation guide including water supply, drainage, and levelling.
Frequently Asked Questions
How do I know if my washing machine is misconnected?
Trace the waste pipe from the machine to where it connects to the drainage system. It should connect to the main foul water stack pipe (the large 4-inch pipe on the outside wall near the bathroom or kitchen) or to a grate that connects to that system underground. If it connects to a grate at the base of guttering fall pipes, or to any drain that receives rainwater, it is misconnected.
What happens if I have a misconnection?
Detergent chemicals and other waste from the appliance drain untreated into local rivers and streams via the surface water system. During heavy rain, the extra water volume can contribute to flash flooding. A misconnection is also illegal – the current householder is responsible for correcting it regardless of when it was made or by whom.
Can I put a washing machine in a garage and drain it correctly?
Yes, but it requires connecting the waste pipe to the foul water system – which garages typically are not connected to. A new run of waste pipe to the foul water stack, or a specialist pump system, is usually needed. Do not connect to any existing grate in the garage floor or at the base of guttering – these are almost certainly surface water drains. See our full guide on washing machines in garages before installing.