How to remove the heater from a washing machine
This guide explains how to remove and replace the heating element in a front-loading UK washing machine. Removing a washing machine heater can be extremely difficult – and in some cases impossible to refit once removed. Only attempt this repair if the element has been confirmed as faulty by testing with a multimeter, and only if you are confident working on appliances.

Working inside a washing machine involves live electrical components and water connections. The machine must be completely unplugged before any internal work begins. If you are not confident with electrical repairs, book a qualified appliance engineer.

If the element has not yet been tested with a meter, check this guide first: is the washing machine heater faulty? Do not remove the element speculatively – it may be impossible to refit without a replacement, and very often a removed element cannot be put back in.
Where Is the Heating Element on a Washing Machine?
On some machines the heating element is located at the back of the main outer drum and can be accessed by removing the back panel. This is the easier scenario. More commonly, however, the element is located at the front of the outer drum, underneath the door seal. In this case the front panel must be removed to gain access.
How easy front panel removal is varies significantly between models and brands – there are no universal instructions. On some washing machines the front panel is even welded in place, making it impossible to remove without taking the entire drum out of the cabinet. If this is the case and you are not able to work out how to access the element safely, call an engineer.
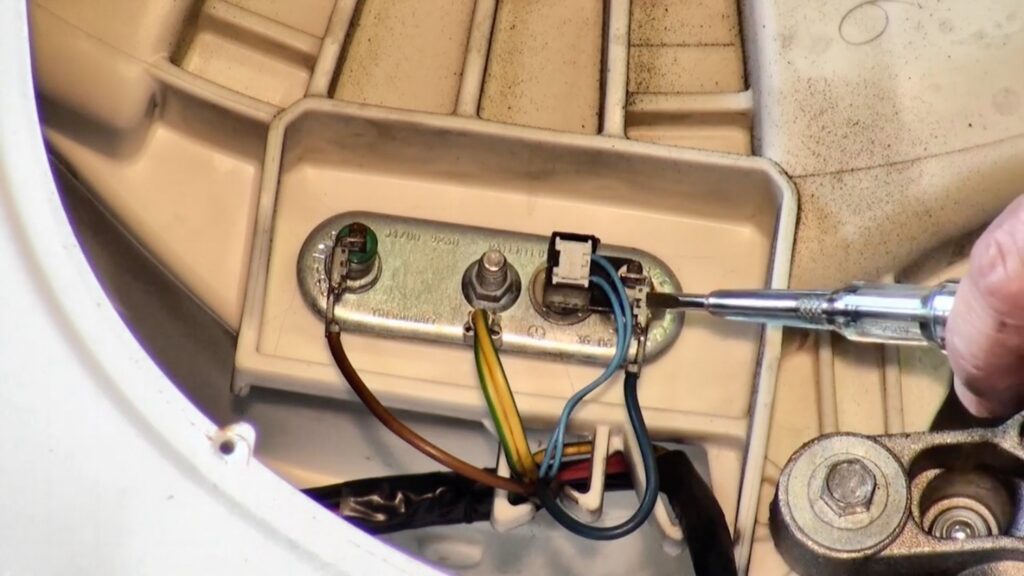
How the Heating Element Is Secured
The mounting system is consistent across virtually all washing machine heating elements. Understanding it before attempting removal makes the process significantly easier.
Behind the two electrical terminals on the element there is a thick rubber seal. Behind that is a metal plate. A bolt runs through the centre of the rubber seal, passing between the two terminals and protruding into the machine. A nut on this bolt – visible between the terminals when the element is fitted – is tightened to draw the metal plate towards the rubber seal, compressing the seal and making the assembly watertight against the outer drum.
When new, the rubber seal is pliable and fits snugly. After years of use at high temperatures, the rubber can become hardened and deformed. This is what makes old elements so difficult to extract – and why a removed element often cannot be refitted.
How to Remove the Heating Element
-
Disconnect the machine from the mains supply completely.
-
Gain access to the element – either from the back panel or by removing the front panel, depending on the machine layout.
-
Note the position of all electrical connections to the element terminals before disconnecting them.
-
Locate the central bolt between the terminals. Undo the nut but do not remove it entirely – unscrew it to the top of the thread so the bolt can be pushed inward.
-
Push the bolt inward to move the metal plate away from the rubber seal inside the drum. A gentle tap with a hammer and punch may be needed – but be careful not to damage the bolt or surrounding plastic.
-
With the plate pushed back, the element can be levered out. Work carefully around the rubber seal, pulling or levering it free all the way around. Do not break the surrounding plastic – most elements are fitted into a plastic outer drum and force applied in the wrong place can cause serious damage.
Even with the nut and bolt pushed fully back, a hard rubber seal can make extraction extremely challenging. A combination of flathead screwdrivers, pliers, and pipe pliers may be needed to work the seal out around its full circumference. Take time and avoid excessive force in any one area. See the Washerhelp forum for a real example with photos: heater change – major fail (Washerhelp forum).
How to Fit a Replacement Heating Element
-
Slot the new element into the drum opening, taking care to locate the end of the element into the heater bracket at the bottom of the tub. This bracket is essential – it prevents the spinning drum from striking the element during a heavily loaded spin cycle. It will either be a small bracket projecting upward, or a cover moulded into the outer drum that the element slots underneath.
-
Once the element is correctly seated, tighten the central nut to draw the metal plate up against the rubber seal. Tighten it firmly enough to compress the rubber properly – but do not over-tighten. If the metal on the heater body begins to bend inward, the nut is too tight.
-
Give the element a firm pull to confirm it is secure. It must not move or pull free.
-
Reconnect the electrical terminals in the correct positions. Refit any panels and run the machine on a short wash cycle while watching carefully for leaks.
A Warning About Refitting Old Elements
There are circumstances where an old element that has been removed needs to be refitted rather than replaced – for example, if it was removed for access to something else and turns out to be undamaged. This should be avoided where possible, as a used element with a deformed rubber seal is much harder to secure reliably.
In one documented case, an old element that required WD-40 lubricant to refit appeared to be seated correctly but was not adequately sealed. The element came out mid-cycle and flooded the kitchen. If lubricant is needed to get an element back in, the result should be treated with extreme caution – testing carefully with the machine running and monitoring closely for the first several cycles.
Always check that a refitted or newly fitted element cannot be pulled free before running the machine. If there is any doubt about the seal, do not run the machine unattended.
Further reading and help
Frequently Asked Questions
Can I refit a heating element once it’s been removed?
Sometimes, but often not reliably. When an element is removed, the rubber seal – which has been compressed and hardened over years of use at high temperatures – becomes deformed and may not create a watertight seal when refitted. In many cases the element can be removed successfully but cannot be refitted without a replacement. This is why removal should only be attempted when replacement is confirmed to be necessary.
How do I know if the heating element needs replacing?
The element should be tested with a multimeter before removal. A faulty element will typically show an open circuit (no continuity) or an extremely high resistance reading. See: is the washing machine heater faulty? Do not remove the element without confirming the fault first.
Why is the heating element so hard to get out?
The element is sealed with a rubber gasket that is compressed tightly against the outer drum by a metal plate and central bolt. Over years of use at high temperatures, this rubber seal hardens and deforms. A new element slides in and out relatively easily, but an old one with a hardened seal can require significant force and careful work with screwdrivers and pliers to extract without breaking the surrounding plastic.
What is the heater bracket and why does it matter?
The heater bracket is a small fitting at the base of the outer drum that supports the end of the heating element, keeping it at the correct position inside the drum. If the element is not located in this bracket when fitted, the spinning inner drum can strike the element during a fast spin with a heavy load – causing damage to both. Always confirm the element end is correctly seated in or under the bracket before tightening.
Is removing a washing machine heating element a DIY job?
It can be, but it is a moderately advanced repair that carries real risks if not done correctly. The machine must be completely disconnected from the mains. The element must be confirmed faulty before removal, as it may not be possible to refit it. The outer drum is usually plastic and can be damaged by excessive force. If there is any uncertainty about the repair, booking a qualified engineer is the safer option.
32 Comments
Grouped into 15 comment threads.
1 reply Hi. My cross got damaged and the drum hit the heating element. This machine, a 15yr old Baucknecht, has a specific knob for temperature selection so its totally in our control whether you use heat or not. Can I bypass the heater by joining its 2 wires?
8 replies Good advice, but . I don't understand the bit about the chance of the drum hitting the heater on spin with a heavy load. Doesn't the gap between the inner and outer drums stay pretty constant unless the bearings are completely knackered, and then it would hit the bracket anyway. I thought the reason for heater bracket was to locate the heater to make sure it wasn't installed at the wrong angle maybe touching the drum in the first place. Is this wrong?
Good advice, but . I don’t understand the bit about the chance of the drum hitting the heater on spin with a heavy load. Doesn’t the gap between the inner and outer drums stay pretty constant unless the bearings are completely knackered, and then it would hit the bracket anyway. I thought the reason for heater bracket was to locate the heater to make sure it wasn’t installed at the wrong angle maybe touching the drum in the first place. Is this wrong?
Likely replying to Colin Stone
Hello Colin. The heater bracket is there to hold it in the right place but also to stop the drum hitting it. There is a gap between the heater and the drum, but on spin, with a heavy load, the drum somehow stretches or wobbles in such a way that it can clip the element. The movement in the drum is likely to be minor, but maybe the absence of a bracket also allows the element to move slightly upwards towards the drum. In any case the heater would only be hit by the drum with heavy load and on fast spin. With a light load on fast spin it would not hit at all. Also, if by any chance the element was to warp it would also help hold it away from the drum or the (now) plastic drum.
It was a very common fault on old Hoover washing machines when they used to use vitreous enamel outer tubs. Their heater bracket was just a bit of metal sticking out that the element slotted in to. It was welded to the bottom of the tub and unfortunately commonly rusted away and fell off. When it did, the washing machine worked perfectly OK except when spinning a heavy load of towels or sheets. Then the drum would clatter the element on every revolution and make a very loud metalic tapping noise about 3 times a second.
Eventually this would damage the element and it would commonly fuse the electrics when the element’s insulation broke down.
These days most heater element brackets tend to be little shelves built into the mould of the plastic outer tub (drum) that the element just slides under. If properly designed it should be impossible to fit it incorrectly.
Likely replying to Andy Trigg (Whitegoodshelp)
Hi Andy,
Have successfully removed the faulty heater element from our Hotpoint machine using screwdrivers and brute force (without breaking anything). The issue I now have is keeping the new one in place (it’s a pattern part, so is a direct replacement). It slots in well enough, but each time i start to tighten the nut on the new one, and the rubber begins to squish down, it squeezes itself out of the hole. How do i keep the element in place long enough for the rubber to squish down on the inside and keep everything in place and water tight?
Any hints / advice please?
Hi Simon. That usually only happens if you used any lubricant on the rubber. I once even had one pop out during a wash! Don’t use any WD40 or washing up liquid. If you have done then get rid of it.
Otherwise there’s no reason why that should happen. Don’t over-tighten. The metal plate under the nut will bend and warp if you do. Also make sure the element is locating properly inside the tub as there should be a bracket it pushes on to or at least a cover that it locates under.
When fitted properly you should be able to pull it without it moving.
Likely replying to Colin Stone
Hi Colin is there a way to bypass the whole heating system without replacing element. I also press the button to give me – so that I wash on cold but clearly the element is faulty now and my machine start washing and stops after 10 minutes and then you can’t get it to wash anymore. I replaced necessary wires but same problem so I can’t even remove it I tried
Hi Zandri. The only way you could do a wash cycle without the heating element as if you have a specific wash cycle that washes in cold water. Any normal wash cycle will use the heating element, and the software that runs the programs will detect that the water level is not rising and therefore abort with an error. I’m not aware of any actual cold wash cycles on washing machines, at least not in the UK. I did a search on Google UK and can only find references to the fact that “cold washes” are deemed as washes at around 20° C.
So if that’s the case then no wash cycle will work without a heating element.
0 replies Full instructions on how to get the heating element out are in this article. If you mean that you have taken off the nut and the thread that it screws onto has been pushed inside you will need to take the heating element out to push it back from the other side. As my article describes though, it may be that the rubber seal on the heating element has become distorted and hard and will not go back. In which case you will need to buy another one.
Full instructions on how to get the heating element out are in this article. If you mean that you have taken off the nut and the thread that it screws onto has been pushed inside you will need to take the heating element out to push it back from the other side. As my article describes though, it may be that the rubber seal on the heating element has become distorted and hard and will not go back. In which case you will need to buy another one.
2 replies Hi You have already remarked on F8 which comes at end of washing cycle. This has just occured on our machine. Is the heating element easy to replace or do i need to buy specialist tools for the job. most importantly where do i buy the element. thanks Tom
Hi You have already remarked on F8 which comes at end of washing cycle. This has just occured on our machine. Is the heating element easy to replace or do i need to buy specialist tools for the job. most importantly where do i buy the element. thanks Tom
Likely replying to tom robertson
Hello Tom. You need to check the heating element with a continuity test meter to see if it is faulty. Otherwise you’re just guessing. The first article I link to in the article above is about how to test a heating element.
All instructions on removing and fitting are in this article. You can buy heating elements for any washing machine here Washing machine spare parts
Likely replying to Andy Trigg (Whitegoodshelp)
Hello Andy. I had to disassemble my washing machine to retrieve an important ring that was is in the sump hose. First, I tried to remove the heating element, however it was stuck and it didn’t came out. Now, as I was assemble the machine back together the nut in the heating element is pushed inside it. What can I do? Do I have to buy a new heating element? How can I bring it out?
1 reply Hello I've got a stuck indesit heating element in washing machine and someone trying to help has fully removed nut! Any ideas for help?
0 replies They are only for car radios so not likely to be 13 amp. Plus they don't have the little tag in the centre for preventing tag from vibrating off. Having said that they will only work if your element has a small hole or indentation for it to clip into. Finally, it's not so advisable to fit those tags without the proper tool. Simply squashing the end with pliers may not be good enough.
They are only for car radios so not likely to be 13 amp. Plus they don’t have the little tag in the centre for preventing tag from vibrating off. Having said that they will only work if your element has a small hole or indentation for it to clip into. Finally, it’s not so advisable to fit those tags without the proper tool. Simply squashing the end with pliers may not be good enough.
0 replies They are only for car radios so not likely to be 13 amp. Plus they don't have the little tag in the centre for preventing tag from vibrating off. Having said that they will only work if your element has a small hole or indentation for it to clip into.
They are only for car radios so not likely to be 13 amp. Plus they don’t have the little tag in the centre for preventing tag from vibrating off. Having said that they will only work if your element has a small hole or indentation for it to clip into.
0 replies Those tags are the ones I used to use by the way. It's hard to find a crimping tool for them because most amp tags now use the round plastic (red blue or yellow) connection method. Without a crimping tool they can be safely attached with care though. With the wire stripped back enough to allow the copper wire to lay inside the smaller inside tabs and ensuring the plastic cable is resting inside the larger outer tabs carefully bend over and tightly squash the open tabs with *narrow nosed pliers. Normal pliers are too big. Then tug firmly on the wire to ensure it's all connected properly.
Those tags are the ones I used to use by the way. It’s hard to find a crimping tool for them because most amp tags now use the round plastic (red blue or yellow) connection method. Without a crimping tool they can be safely attached with care though. With the wire stripped back enough to allow the copper wire to lay inside the smaller inside tabs and ensuring the plastic cable is resting inside the larger outer tabs carefully bend over and tightly squash the open tabs with *narrow nosed pliers. Normal pliers are too big.
Then tug firmly on the wire to ensure it’s all connected properly.
1 reply Actually now you mention it I meant Maplin. I suppose their market is more small appliances and devices. I've discussed amp tags before in the comments so read them all to get more information. It's very important to get good quality 13 amp tags and that they are fitted properly. Otherwise the wires can overheat and burn or the tags can shake off. I've just found these. Check they are the right size but they claim to be made for high energy appliances. They also have the small tag in the centre that clips into a small hole on the element connector and stops them vibrating off https://www.amazon.co.uk/Terminal-Resistant-Terminals-Manufacturing-Appliances/dp/B003WAQE78
Actually now you mention it I meant Maplin. I suppose their market is more small appliances and devices. I’ve discussed amp tags before in the comments so read them all to get more information. It’s very important to get good quality 13 amp tags and that they are fitted properly. Otherwise the wires can overheat and burn or the tags can shake off.
I’ve just found these. Check they are the right size but they claim to be made for high energy appliances. They also have the small tag in the centre that clips into a small hole on the element connector and stops them vibrating off
https://www.amazon.co.uk/Terminal-Resistant-Terminals-Manufacturing-Appliances/dp/B003WAQE78
ah thanks thats what ill get.
was looking at these https://www.amazon.co.uk/gp/product/B00CZA4UXQ/ref=ox_sc_act_title_4?ie=UTF8&psc=1&smid=A40TWAGYOCQGL
but they didnt seem to know amps.
thank you
2 replies replaced my heater but now having problems connecting connectors as i only have pliers. what kind of crimping tool do i need? also one of the connectors broke so can i use 1.5mm² - 2.5mm² / 16 - 14 AWG. connector to replace? I've asked seller amps but they just gave me these details. thanks
replaced my heater but now having problems connecting connectors as i only have pliers. what kind of crimping tool do i need? also one of the connectors broke so can i use 1.5mm² – 2.5mm² / 16 – 14 AWG. connector to replace? I’ve asked seller amps but they just gave me these details.
thanks
Likely replying to james butcher
Hi James. You need 13 amp connectors. You can buy a proper tool for them. Try Tandy who should sell both. I used to sometimes connect the old type with little tabs that fold over the wire and the cable with pliers and narrow nosed pliers but I can only recommend you use the proper tool. If they are the ones with a round plastic part that the wire shoves into I’d definitely use the proper tool.
Leave a comment
0 replies It can be very hard to get one out. If you've followed the instructions in my article regarding the nut and plate then it's down to carefully levering it out bit by bit. If fitted into a plastic plate you have to be careful not to break anything. Basically the rubber flange seal that holds the heater in place and seals it can become very hard and squashed and it can be very difficult to get one out if the washing machine is several years old.
It can be very hard to get one out. If you’ve followed the instructions in my article regarding the nut and plate then it’s down to carefully levering it out bit by bit. If fitted into a plastic plate you have to be careful not to break anything. Basically the rubber flange seal that holds the heater in place and seals it can become very hard and squashed and it can be very difficult to get one out if the washing machine is several years old.
0 replies cant not get heater out of hoover washing machine it seems to be stuck any advice please
cant not get heater out of hoover washing machine it seems to be stuck any advice please
1 reply Hi, I have a 10+ year old Bosch WFT2830 washing machine. It keeps tripping despite a new heater element and NTC sesonor. Any ideas what else the cause might be. Thank you!
Hi,
I have a 10+ year old Bosch WFT2830 washing machine. It keeps tripping despite a new heater element and NTC sesonor. Any ideas what else the cause might be.
Thank you!
Likely replying to Kay A.
Hello Kay. If it isn’t the heating element it could be anything. I have an article on your problem here Tripping or Fusing Electrics
1 reply My washing machine wasn't heating on opening to access heater element the neutral wire plastic casing had melted and disconnected. Having reattach via crimping, are the plastic connections available to purchase, or is there an alternative? Can just soldering the wire on be safe, or is there ampage with the plastic connectors? Live is happily sitting sturdy. I can see earth us crimped secure.
My washing machine wasn’t heating on opening to access heater element the neutral wire plastic casing had melted and disconnected. Having reattach via crimping, are the plastic connections available to purchase, or is there an alternative?
Can just soldering the wire on be safe, or is there ampage with the plastic connectors? Live is happily sitting sturdy. I can see earth us crimped secure.
Likely replying to Claire
Hello Claire, you need to use 13 amp terminal connectors but they are very difficult to find – especially online because there are many that look exactly the same in a photo but are different sizes and amp ratings in reality. I would try somewhere like Maplins but go to a shop and make sure they are rated for 13 amps and the right size. Any electrical shop should have them. Most of them need a proper crimping tool to fit them though but some can be crimped manually with pliers. However, if you do not attach them properly they could overheat and burn out!
0 replies removed washing machine heat element to remove bra wire your page was clear and helpful thank you
removed washing machine heat element to remove bra wire your page was clear and helpful thank you
Hi. My cross got damaged and the drum hit the heating element. This machine, a 15yr old Baucknecht, has a specific knob for temperature selection so its totally in our control whether you use heat or not.
Can I bypass the heater by joining its 2 wires?
Definitely not no. It would go with a hell of a bang. You can’t bypass a heater though if the live is disconnected it would obviously stop it being activated.