Can’t Get Drum Bearings Out

A drum shaft that jams partway out is almost always caused by a collapsed front bearing – one where rust and bearing failure have fused the shaft to the inner bearing race. This makes removal significantly harder than normal. The shaft can usually be freed by supporting the drum spider on a block of wood and striking more firmly with a plastic-headed mallet. If separated, check the shaft carefully for damage before reusing it.

Drum bearing replacement involves significant disassembly of a major appliance. Always unplug the machine from the mains before starting any work. If you are not experienced working on electrical or mechanical appliances, book a qualified engineer instead. Read our DIY repair safety advice before proceeding.
Why has the drum shaft jammed?
Under normal conditions, the drum shaft should knock out fairly easily once the pulley has been removed – a heavy plastic-headed mallet and some firm blows are usually sufficient. If the shaft has moved partially but then stopped, the cause is almost always a collapsed front bearing.
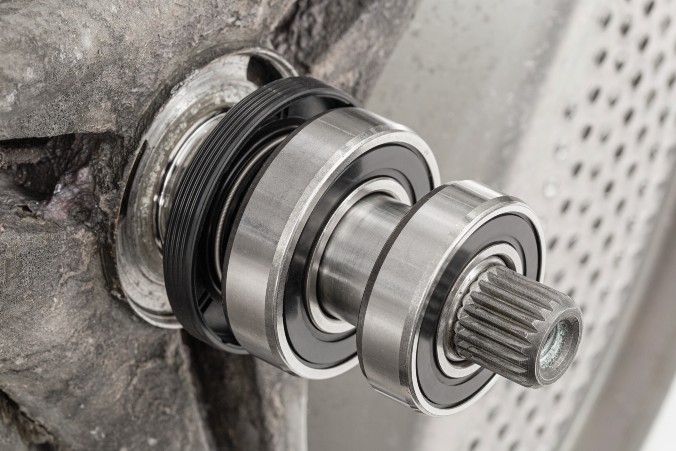
How drum bearings fail
Drum bearings fail when water gets past the seal that protects them. This washes out the grease, allows rust to form, and the bearing surfaces degrade. The result is the characteristic rumbling or grinding noise that gets progressively louder over time. See our guide: what do noisy drum bearings sound like?
What happens if bearings are left too long
If worn bearings are not replaced promptly, the front bearing can deteriorate to the point of complete collapse. At this stage, the drum shaft can effectively fuse to the inner race of the bearing through rust and corrosion. What should be a straightforward knock-out becomes extremely difficult, and in some cases the shaft and bearing are so fused that separation causes damage to the shaft itself.
The shaft moves partway then stops
If the shaft has moved a short distance and then jammed solid, this is a strong sign that the front bearing has collapsed and the shaft is bonded into the remains of the bearing. The shaft is not simply tight, it has seized. More force, applied correctly, is needed.
How do you free a jammed drum shaft? Step by step

This will damage the shaft threads and the shaft itself, making the situation worse. Always use a plastic-headed mallet, or place a solid block of wood over the shaft to absorb the blow if you only have a metal hammer.
-
Remove the pulley if not already done. The pulley must be off before you can knock the shaft through. With the pulley in place, there is nothing for the shaft to pass into.
-
Position a block of wood under the drum spider. Place a solid block of wood between the drum spider (the three-armed metal casting that connects the drum to the shaft) and the outer tub. This gives you a firm base for the spider to push against as you strike the shaft, making each blow more effective rather than simply flexing the assembly.
-
Strike the shaft with a heavy plastic-headed mallet. Use firm, heavy blows. The goal is to break the rust bond between the shaft and the collapsed bearing inner race. This requires meaningful force – light tapping will not be effective. Strike the centre of the shaft squarely.
-
If the shaft will not move further, try the pulley bolt method. Screw the pulley bolt back into the shaft approximately three-quarters of the way, without the pulley fitted. This gives you a protected striking surface and keeps your blows centred on the shaft axis. Strike the head of the bolt. Be careful not to drive the bolt in so far that it damages the thread inside the shaft.
-
Alternate blows with attempts to rotate the shaft. After each set of blows, try to twist the shaft slightly. Rotation can help break a rust bond more effectively than linear force alone. Some penetrating oil applied around the bearing area and left for a few hours may also help if progress stalls.
-
Once free, inspect the shaft carefully. A shaft that has fused to a collapsed bearing may have surface damage or score marks. Check the bearing surfaces along the shaft for damage. A damaged shaft should be replaced – running the machine with a compromised shaft will cause rapid failure of the new bearings.
Is the repair worth attempting?
This is a fair question to ask before spending money on parts or significant time on the job. There are a few factors to weigh.
 Reasons to continue
If you have already stripped the machine this far, you have invested time that is sunk regardless. Drum bearings themselves are inexpensive spare parts. DIY bearing replacement on a machine you would otherwise scrap costs only the parts, and the worst realistic outcome is that the repair fails and you are in no worse position than before.
 Reasons to reconsider
If the shaft is damaged when extracted and needs replacing, cost rises significantly. On budget machines, professional bearing replacement is often uneconomical – the labour cost alone can approach or exceed the machine’s replacement value. A damaged shaft may indicate the repair is not viable without further expenditure.

The economics of bearing replacement vary considerably by machine. On mid-range and premium machines, a DIY bearing replacement that costs only the parts price is very good value. On the cheapest budget machines, even the parts cost may not be justified against a low replacement price. See our guide on noisy washing machine diagnosis for context on what to expect from bearing wear.
What are the DIY repair safety reminders?
Drum bearing replacement is a major mechanical repair. The following safety principles apply throughout.
- Machine must be unplugged from the mains at all times during the repair. This is non-negotiable. Even with the machine switched off, it remains connected to mains electricity while plugged in.
- Never use a metal hammer directly on the shaft or any threaded component. Always use a plastic mallet or interpose a block of hardwood. Metal on metal will damage threads and shaft surfaces.
- Support the machine and components securely before applying force. An unsupported outer tub or drum assembly can shift unexpectedly under blows, causing injury or component damage.
- Review our full DIY safety guide before starting any appliance repair. See our DIY repair safety advice. It covers precautions beyond basic electrical safety that are easy to overlook.
Not confident tackling this yourself?
Drum bearing replacement is one of the more involved washing machine repairs. If you would prefer a qualified engineer to handle it, or need spare parts, we can help.
Frequently asked questions about a stuck drum shaft
Why is my drum shaft stuck partway out?
This almost always means the front drum bearing has collapsed. When bearings fail due to water ingress and rust, the inner bearing race can fuse to the shaft. The shaft moves initially because the rust bond breaks partially, then jams when it reaches the most corroded section. More force, applied with the drum spider supported on a block of wood, is needed to break the bond completely.
Can I use a metal hammer to knock out the drum shaft?
No, never strike the shaft or any threaded component directly with a metal hammer. Use a plastic-headed mallet. If you only have a metal lump hammer, place a solid block of hardwood over the shaft to absorb the blow and protect the threads. Striking metal on metal risks damaging the shaft surface and threads, potentially making the repair impossible.
What is the pulley bolt method?
If the shaft will not move further with the end exposed, screwing the pulley bolt back into the shaft approximately three-quarters of the way (without the pulley) gives you a protected striking surface centred on the shaft axis. You can then strike the bolt head rather than the bare shaft end. Be careful not to drive the bolt so deep that it damages the internal thread.
If I get the shaft out, do I need to replace it?
Inspect the shaft carefully once removed. Surface damage, score marks, or visible corrosion in the bearing contact areas means the shaft should be replaced rather than reused. Running the machine with a compromised shaft will cause rapid failure of the new bearings and you will be back to the same job very quickly.
Is drum bearing replacement worth doing on a cheap washing machine?
On budget machines, professional drum bearing replacement is often not economical – the labour charge can approach or exceed the machine’s replacement value. However, DIY replacement costs only the parts price, which makes it worthwhile in many cases even on lower-value machines. The exception is if the shaft needs replacing too, which adds significant cost. If the machine has little residual value and the repair is complex, it may be better replaced.
How can I tell if my washing machine needs new drum bearings?
The main symptom is a rumbling or grinding noise that gets progressively louder over time, particularly noticeable during the spin cycle. The noise often changes in character as the drum speeds up. See our guide: what do noisy drum bearings sound like?
Should I replace both bearings or just the failed one?
Always replace both bearings as a pair, along with the drum shaft seal, in a single repair. The bearings work together as a set and, if one has failed, the other is almost certainly close to failing. Reopening the machine to replace the second bearing later means redoing the entire labour-intensive disassembly, which dwarfs the cost of a second bearing. Bearing replacement kits for most mainstream brands include both bearings, the seal, and any specific gaskets or spacers needed for that model. Order the kit by exact model number to ensure correct sizes.
0 Comments