How to remove something stuck in washing machine

Start by checking the pump filter – small objects often find their way there. If the drum is making a scraping noise, check for a bra underwire poking through a drum hole. For coins or keys causing scraping, check the sump hose before considering stripping the machine down. Always unplug the machine before any investigation.
If something has been left in a pocket and found its way inside the washing machine – between the inner and outer drum – it may need to be removed before the machine is used again. This guide covers how to approach the problem, from the simplest checks through to more involved access methods.
Before Starting – Assess What Is Stuck
Not everything that finds its way into the drum needs to be immediately removed. Consider what the object is and what it could do:
- Something flimsy – unlikely to cause damage to the drum. The worst outcome is it eventually reaches the pump filter and causes a blockage. This is inconvenient but relatively easy to fix via the pump filter.
- Something substantial – coins, keys, or other hard metal objects can punch a hole through a plastic outer drum or crack it. These should be removed before the machine is used again.
- No noise heard – if the machine is running without any scraping or knocking, check the pump filter first. Many objects find their way there without causing drum damage.
If a scraping noise is present when the drum turns, confirm the noise is coming from the drum and not a motor fault by removing the drive belt temporarily and turning the drum by hand.

Ensure all water has drained before disconnecting any hoses.
Bra Underwires
The most common object to cause a persistent scraping noise when the drum turns is a bra underwire. Underwires are less likely to punch through a plastic drum than solid metal objects, but they can cause leaks by working into the front plate seal, and commonly get stuck in the sump hose and pump filter – where they snag fabric fibres until a blockage forms.
How to Find a Bra Underwire
Open the door and inspect all the holes in the inner drum very carefully by eye and by feel. A millimetre of the wire end may be just visible protruding through one of the holes – it can be extremely hard to spot on a normal look. If found, it can sometimes be pulled back through the hole with a pair of pliers.
If it has made its way to the pump filter, it can usually be retrieved by removing the pump filter.
Accessing the Sump Hose
If the obstruction cannot be found by inspecting the drum holes or pump filter, the next step is to access the sump hose – the black concertina hose that runs from the bottom of the outer tub to the water pump. Objects often end up here or just above it.
-
Remove the back panel of the machine. On machines with a small inspection plate rather than a full back panel, lay the machine on its front to access the sump hose from underneath.
-
Place a bath towel under the area – there is always some water remaining in the sump hose.
-
Disconnect the sump hose at the tub end and pull it away from the outer tub.
-
Look carefully inside the hose and feel through the hole in the bottom of the tub. An underwire may be here, possibly trapped near or under the heating element.
-
If nothing is found, tip the machine back and forth gently – the object may slide to the hole where it can be reached.
Removing a Drum Paddle to Access the Outer Tub
Washing machines usually have three plastic drum paddles (lifters). On some models, one or more of these can be removed to gain access to the bottom of the outer tub.
Look for a hole on the top of the paddle that is slightly larger than the others. Inserting a small screwdriver into this hole and pressing down should release a tab, allowing the paddle to slide back and off. This method is common on Hotpoint and Indesit machines, though not all models allow paddle removal.

Make sure the metal tab is clipped back into place. A paddle that comes loose mid-wash will cause serious damage. If a paddle breaks or cannot be refitted, the machine cannot be used until it is replaced. Check availability: washing machine drum paddle (lifter) replacements.
Access via the Dispenser Hose or Heating Element
If the obstruction appears to be trapped in the middle of the drum area, there are two further access options – though both are more involved:
- Dispenser hose opening – the hole where the dispenser hose connects to the outer drum (where water and detergent enters from the soap drawer) may allow access to an obstruction with a flexible tool or wire.
- Removing the heating element – sometimes an underwire becomes mangled and trapped on or around the heater. Removing the element can allow access. This is only recommended as a last resort, as the heater must be correctly relocated under its retaining bracket when refitted – an incorrectly fitted heater can be dislodged during spin, causing a flood. See: how to remove a washing machine heater.
If Nothing Works – Sealed Outer Tubs
If none of the above methods locate the obstruction, the only remaining option is to strip the machine down. Unfortunately, an increasing number of washing machines – particularly budget models – are manufactured with sealed outer tubs that cannot be split open for internal access. On these machines, removing a trapped object or carrying out internal repairs becomes impossible without specialist equipment. This is a significant design limitation worth considering when buying a new machine.
Need professional help?
Frequently Asked Questions
Something is stuck in my washing machine drum – what should I do first?
First assess what the object is. If it is flimsy and causing no noise or damage, checking the pump filter periodically may be all that is needed. If it is hard and causing a scraping noise, unplug the machine and check the drum holes carefully by eye and feel. Then check the sump hose before considering stripping the machine down.
How do I remove a bra underwire from a washing machine drum?
Open the door and inspect each drum hole carefully, including by feel. A tiny amount of the wire may be protruding through a hole and can be pulled out with pliers. If it cannot be found in the drum, check the pump filter – underwires commonly travel there and can usually be retrieved through the filter access point.
Can coins or keys write off a washing machine?
Yes – modern washing machines have plastic outer drums, and hard metal objects spinning at speed can punch a hole through the plastic or cause serious cracking. The inner drum, heating element, and front plates can also be damaged. If coins or keys are stuck in the drum area, the machine should not be used until they are removed.
What causes black mould on washing machines?
Black mould in washing machines is caused by a combination of low wash temperatures, underdosing detergent, and leaving the door closed between washes. This creates a warm, damp environment lined with detergent and fabric residue – ideal conditions for mould growth. The solution is regular hot washes, correct detergent dosing, and leaving the door ajar after every wash.
Black mould inside a washing machine is a common problem and almost always preventable. It tends to build up gradually and is usually well established before it is noticed. Understanding what causes it makes it straightforward to stop it coming back.
Why Do Washing Machines Get Black Mould?
A washing machine is warm, damp, and regularly coated in detergent residue and grease from clothing. Left at low temperatures without adequate cleaning, the interior becomes an ideal environment for mould and bacteria. The problem has become more common as wash temperatures have fallen – a trend driven by energy efficiency standards and the growth of quick wash and cool wash cycles.

Low temperature washing
Washing consistently at 30°C or below does not get hot enough to kill bacteria or dissolve the greasy deposits that mould feeds on. Modern machines wash at lower temperatures than older ones, and the interior never gets a proper hot clean unless a high temperature cycle is run deliberately.

Quick wash cycles used too often
Short, cool cycles are useful for lightly soiled items but provide no cleaning benefit for the machine itself. Using quick washes as the primary cycle means the drum, seal, pipes, and drawer never receive the temperature or cycle length needed to remove built-up residue.

Incorrect detergent dosing
Using too little detergent leaves grease and soiling on drum surfaces. Using too much – particularly liquid detergent or capsules – can leave undissolved residue in the drum and pipes that provides food for mould and bacteria. Always follow dosing instructions for the water hardness in the local area.

Door kept closed between washes
A closed door after a wash traps moisture inside the drum and door seal. Combined with residual warmth and detergent residue, this creates exactly the conditions mould needs to establish. Leaving the door slightly open after every wash allows the interior to dry out between uses.

Liquid detergent and capsules
Powder detergent dissolves more completely and is less likely to leave residue. Liquid detergent and capsules – particularly multi-tab products – are more prone to leaving waxy, greasy deposits on drum surfaces and pipes over time, especially at lower temperatures.

Fabric softener build-up
Fabric softener used in excess, or used in machines that are not regularly cleaned at high temperatures, can leave a residue in the drum and soap drawer that contributes to mould and bacterial growth.
Where Does Black Mould Appear?
Black mould tends to accumulate in the areas of the machine that stay damp and are not exposed to the full wash action:
- Door seal (rubber gasket) – the folds of the rubber seal around the door trap water and lint after every wash and are the most common location for black mould growth.
- Soap dispenser drawer and housing – detergent and fabric softener residue builds up in the drawer and the recess it sits in, providing an ideal surface for mould. See: black jelly in the soap drawer.
- Drum interior – particularly in the areas behind the door seal and around the drum paddles where water collects.
- Internal pipes and sump hose – mould and biofilm can accumulate inside pipes where it is invisible but contributes to bad smells and transfers onto laundry.
How to Treat Existing Black Mould
Visible mould on the door seal and drawer can be treated directly. Internal build-up requires a maintenance wash.
-
Clean the door seal. Pull back the folds of the rubber gasket and wipe away any visible mould with a damp cloth and a small amount of washing machine cleaner or a dilute bleach solution. Rinse thoroughly. A soft-bristled brush helps reach into the folds.
-
Remove and clean the soap drawer. Pull the drawer fully out and wash it in warm soapy water. Clean the housing recess with a cloth or brush to remove detergent build-up. Leave both to dry before replacing.
-
Run a maintenance wash. Run an empty drum cycle at 60°C or 90°C with a purpose-made washing machine cleaner, or with a scoop of washing soda crystals in the drum. This cleans the drum, pipes, and internal components that cannot be reached manually. Do this at least once a month if low temperature cycles are used regularly.
-
Leave the door open after every wash. After removing the laundry, leave the door slightly ajar and pull the soap drawer out a few centimetres to allow air to circulate. This significantly reduces moisture build-up between washes.
Once black mould is well established in internal pipes and hoses, it can be very difficult to fully eliminate. Running regular hot maintenance washes from the start avoids this problem entirely.
How to Prevent Black Mould Coming Back
- Run at least one 60°C or 90°C wash cycle per week – this is the most effective single preventive measure.
- Leave the door and drawer open between washes.
- Use powder detergent rather than liquid where possible, and dose correctly for the water hardness in the area.
- Avoid overusing fabric softener.
- Run a monthly maintenance wash with a washing machine cleaner or soda crystals.
- Wipe down the door seal after the last wash of the day.
Still getting smells after cleaning?
Frequently Asked Questions
What causes black mould in a washing machine?
The main causes are consistently low wash temperatures, frequent use of quick wash cycles, incorrect detergent dosing, and keeping the door closed between washes. These conditions create a warm, damp, residue-lined environment that mould thrives in. The problem has become more common as modern machines wash at lower temperatures and shorter cycle times.
How do I get rid of black mould in my washing machine?
Clean the door seal manually by pulling back the rubber folds and wiping away visible mould. Remove and clean the soap drawer and its housing. Then run an empty 60°C or 90°C wash with a washing machine cleaner or soda crystals to clean internal pipes and components. Repeat monthly to prevent it returning.
How do I stop black mould coming back?
Run at least one hot wash per week at 60°C or above. Leave the door and soap drawer slightly open between washes to allow the interior to dry out. Use powder detergent correctly dosed for local water hardness. Run a monthly maintenance wash with a washing machine cleaner or soda crystals.
Is black mould in a washing machine harmful?
Black mould and the bacteria that accompanies it can transfer onto laundry, causing musty smells on clothing even after washing. Some types of mould can cause skin irritation or aggravate respiratory conditions in sensitive individuals. Treating and preventing mould build-up is important both for appliance performance and for the hygiene of the laundry washed in it.
Problems after fitting carbon brushes
Start by confirming whether the motor was running before the brushes were replaced. If it was, the problem was introduced during fitting. Check the motor plug connections, the wires to both brush holders, and that the brushes are fitted the correct way around and are not stuck in their holders. If the motor was not running before fitting either, the original fault may not have been the brushes at all.
If new carbon brushes have been fitted to a washing machine motor and the motor still does not run, there are several specific things to check before concluding the motor has failed.
Was the Motor Running Before the Brushes Were Replaced?
The answer to this question changes the diagnosis significantly:
- If the motor was running before – and it no longer runs after the brush replacement – something went wrong during fitting. Work through the checks below.
- If the motor was not running before – and it still does not run with new brushes – there are two possibilities. Either something went wrong during fitting, or the original fault was not caused by worn brushes at all. Check the work carefully, and if satisfied that fitting was correct, the fault lies elsewhere. See: possible causes of a motor not running.
Check the Motor Plug Connection
Confirm the motor plug is connected to the motor and fully seated. Disconnect it and inspect the pins in both the motor connector block and the plug itself. When connectors are pushed together with pins slightly misaligned, one or more pins can be pushed back out of their seating.
Gently press down on each pin in the motor block to check if any push inward under light pressure. Use only very light pressure – the aim is to identify a pushed-back pin, not to create a new fault.
Check the Wires on the Carbon Brush Holders
Both carbon brush holders have small wires providing the electrical connection to the brush. Confirm both wires are properly connected and secure.
Ideally, check continuity across the brushes using a multimeter. Measure across the two relevant pins in the motor connector block – this tests the circuit from one pin, down to a brush, across the commutator, back up through the second brush, and out to the second pin. An open circuit reading indicates a broken connection somewhere in this path.
Were the Brushes Fitted the Right Way Around?
Modern carbon brushes are usually designed to fit only one way, but some replacement brushes are non-genuine copies that may not be exact matches. Consider the following:
- Were any lugs filed off or modifications made to get the brushes to fit? If so, they may not be seated correctly.
- Was just the carbon material replaced inside existing holders, rather than the complete brush and holder assembly? Fitting carbon material into old holders is not ideal and can cause poor contact.
- Are the brushes from the correct range? A brush intended for a slightly different motor may appear similar but not seat correctly.
Remove both brushes and check they are not stuck inside their holders. The brush should press all the way in and spring straight back out when released. If a brush is sticking, it will not maintain proper contact with the commutator. On older Hotpoint and Creda brushes in particular, the small brass lug must be fully released before fitting – if it was not, the brush can become stuck in the holder. A charred brush is a sign it has been stuck and not making proper contact.
Was the Original Fault Actually the Brushes?
If fitting is confirmed to be correct and all connections are sound, the original fault may not have been worn carbon brushes at all. The motor TOC (thermal overload cut-out) is worth testing. A blown TOC will prevent the motor from running and requires a continuity tester to identify. This is a common cause of motor failure on Hotpoint and Creda machines.
The Washerhelp forum has a dedicated Hotpoint and Creda section where searching for “carbon brushes” or “TOC” may surface relevant solved cases: Washerhelp forum.
For full carbon brush diagnostic guidance with photos, see: Hotpoint and Creda carbon brushes diagnostics.
Frequently Asked Questions
I fitted new carbon brushes and now the motor doesn’t run – what should I check first?
First confirm whether the motor was running before the brushes were replaced. If it was, check the motor plug pins for any that have pushed back into their seating, check the wires to both brush holders are properly connected, and confirm the brushes are seated correctly and not stuck in their holders. If the motor was not running before fitting either, the original fault may not have been the brushes.
What is a TOC and why might it be causing the motor not to run?
A TOC (thermal overload cut-out) is a safety device inside the motor that blows if the motor overheats. When blown, it breaks the circuit and the motor will not run – regardless of whether the carbon brushes are new or worn. It requires a continuity tester to diagnose. If the brushes have been correctly fitted but the motor still does not run, a blown TOC is a likely cause to investigate.
Could the original fault have been something other than worn brushes?
Yes. If the motor was not running before the brushes were replaced and is still not running with new ones, it is possible the brushes were not the cause of the fault at all. A blown motor TOC, a wiring fault, or a faulty motor winding could all prevent the motor from running regardless of brush condition. See: possible causes of a motor not running.
Fitted brushes now motor sparking
A small amount of sparking and noise is normal when new brushes bed in. Excessive sparking, arcing, or flashing around the commutator indicates a serious fault – stop using the machine immediately. A loud ratcheting noise usually means the brushes were fitted the wrong way around. A click on each revolution suggests a raised or loose commutator bar.
This guide covers problems that can occur after fitting new carbon brushes in a washing machine motor – including sparking, strange noises, and loud clicking. Some of this advice also applies if these issues are present without having recently replaced the brushes.
Motor Is Sparking After New Brushes
A small amount of sparking is normal while new carbon brushes bed into the commutator. Very minor sparks during this period are not a cause for concern and should diminish after several washes.
However, heavy sparking – particularly flashing or arcing around the commutator – indicates a serious problem. The machine should be stopped immediately to prevent further damage.
Have the Brushes Been Fitted Correctly?
The first thing to verify is that the brushes are fitted the correct way around. Modern brushes sit inside plastic holders that are keyed to fit only one way in the correct motor. However, problems can arise if:
- The carbon material was removed from the original holders and placed into new holders manually – which can reverse the orientation.
- The wrong brushes were forced to fit, or the keying stubs were removed to make them fit.
A correctly fitted brush has its curved end trailing against the commutator (the copper segments). If fitted the wrong way around, only the tip of the brush contacts the commutator instead. This causes a loud ratcheting sound, excessive sparking, and loss of motor power.
Correct Fitting but Still Excessive Sparking?
If the brushes are confirmed to be correctly fitted but excessive sparking or large flashes continue, the cause is poor contact between the brush and the copper commutator segments. This is typically due to a worn commutator or a major fault on the armature. In either case, replacing the armature is the only remedy – and as most manufacturers no longer supply armatures as separate parts, this usually means replacing the entire motor.
Motor replacement is an expensive repair. Confirm the diagnosis is correct and that fitting is within the repairer’s experience before committing to this cost. An incorrectly diagnosed or incorrectly fitted motor will not resolve the fault.
Motor Is Making a Strange Noise After New Brushes
New carbon brushes require a bedding-in period. During the first run and the first several washes, the motor can make a noticeably loud noise as the new brushes ride over the commutator segments. This is normal and should diminish within a minute or two of first running, and reduce further after several washes.
As long as sparking is not excessive, the noise alone is not cause for concern. The noise during running should be similar to the noise heard when turning the drum by hand.
Motor Making a Loud Click on Each Revolution?
A distinct click on every single revolution of the motor – rather than a general noise – suggests that one of the individual copper bars on the commutator is slightly raised or loose. In serious cases, a bar may be missing entirely. This cannot be repaired and will require a new armature or motor.
To test for this, remove the motor from the machine. Place a fingertip on the commutator (the copper section divided into individual segments). Slowly rotate the armature from the belt-drive end and feel whether any copper bar is slightly raised above the others. If one is, the motor needs replacing if economically viable to do so.
Do not work on washing machine motors without experience and a clear understanding of electrical safety. Always unplug the machine before any inspection or disassembly. See: DIY washing machine repair warnings and 3 good pre-repair tips.
Frequently Asked Questions
Is it normal for a washing machine motor to spark after fitting new carbon brushes?
A small amount of sparking is normal during the bedding-in period. Very minor sparks should diminish after several washes. Excessive sparking, large flashes, or arcing around the commutator is not normal and the machine should be stopped immediately to prevent further damage.
What causes a loud ratcheting noise after fitting new carbon brushes?
This usually means the brushes have been fitted the wrong way around. A correctly fitted brush has its curved end trailing against the commutator. If fitted in reverse, only the brush tip contacts the commutator, causing a loud ratcheting sound and excessive sparking. Remove the brushes and refit them the correct way.
What causes a click on every revolution of the motor?
A click on each revolution typically indicates that one of the individual copper bars on the commutator is slightly raised or loose. This cannot be repaired and requires a new armature or motor. Test by removing the motor and slowly rotating the armature by hand while feeling the commutator surface for any raised segment.
How to fit new Hotpoint carbon brushes
Slide the brushes into the motor with the carbon retracted and held captive inside the holder. Once fully seated and clicked in place, bend the small brass lug outward to 90 degrees to release the brush. Never release the brush before inserting – doing so risks the carbon snapping or being displaced inside the motor undetected.
This guide covers how to fit the older slot-in type Hotpoint and Creda carbon brushes – the type that slide directly into the motor rather than being fixed in holders with screws. The fitting instructions apply equally to both the older black type and the later laminated type.
Even experienced repairers can be electrocuted if proper precautions are not taken. All motors and the washing machine as a whole should be tested for insulation leaks to earth using a megger at 500v DC before work begins. Read the full safety guidance first: washing machine repair safety.
Accessing the Brushes Next to the Tub Weight
On Hotpoint motors mounted on top of the tub, access to the brush next to the tub weight can be improved by removing that weight. It is possible to change the brush with the weight in place using a short stubby flat-bladed screwdriver to lever the old brush out, but the process is more difficult. Some repairers prefer to remove the motor entirely instead.
If removing the tub weight – take care not to overtighten when refitting. Overtightening can shear the bolt or crack the tub bracket. Under-tightening can allow the weight to work loose over time and cause damage. Avoid tools that generate excessive leverage.
If removing the motor – note the belt tension before removal and mark the motor position against the tub fixing bracket before loosening. When refitting, the belt should have a slight “ping” when plucked, with around a quarter of an inch of play either side. It must be tight enough not to slip under load but not so tight that movement is restricted. If the belt was already slack through wear, tighten it slightly when refitting rather than returning it to the worn position.
How to Fit the Carbon Brushes

Top brush: brass lug released, carbon brush popped out. Bottom brush: lug still pressed in, brush held captive. Brushes should arrive in the captive position shown by the bottom brush.
The brushes should be received with the carbon held captive inside the holder – like the bottom brush in the image above. The small brass lug pressed into the brass strip holds the carbon in place. If either brush has come out of its holder in transit, push it back inside before fitting.
Releasing the carbon before insertion risks it snapping, or riding over or under the armature during insertion without being noticed. If this happens, the brush can break months later and release the spring into the motor, causing extensive damage.
The correct fitting sequence is:
-
Slide each brush into its slot in the motor with the carbon retracted and held captive inside the holder.
-
Push the brush all the way in until it clicks securely into place.
-
Bend the small brass lug outward to approximately 90 degrees to release the captive carbon and allow it to contact the commutator. Use a small flat implement such as a blade to lever the lug out. Make sure it is bent far enough – if the lug is not fully released the brush can stick inside the holder and fail to make proper contact.
Cleaning the Commutator
The commutator is the ring of copper segments that the carbon brushes run against. When new, it has a clean copper colour. Over time, the carbon brushes deposit black carbon on the segments. In theory, new brushes will run adequately on an uncleaned commutator – but in practice, cleaning the commutator before fitting new brushes significantly improves the chances of the brushes bedding in correctly.
Professional repairers use a comm stick for this purpose – a dedicated tool costing around £10. A very fine emery cloth can be used as an alternative if a comm stick is not available.
Coarser abrasives can scratch the soft copper surface or embed grit into it, causing sparking and potentially serious motor damage.
Is It Safe to Fit Carbon Brushes Yourself?
Physically, fitting Hotpoint carbon brushes is a straightforward task. However, working on washing machine motors involves genuine electrical risk. This type of repair is not recommended for anyone without prior experience of electrical appliance repair. Competent repairers still need to follow proper safety procedures at every stage. See: washing machine repair safety.
For diagnostic advice before attempting fitting, see: Hotpoint and Creda carbon brushes diagnostics.
Frequently Asked Questions
Should I release the carbon brush before inserting it into the motor?
No. The brush must be inserted with the carbon retracted and held captive inside the holder. Once the holder is fully seated and clicked into place, the brass lug is then bent outward to release the brush. Releasing the carbon first risks it snapping or being displaced inside the motor without being noticed, which can cause serious damage later.
How far should the brass lug be bent when releasing the brush?
Bend it outward to approximately 90 degrees. If the lug is not bent far enough, the brush can stick inside the holder and fail to make proper contact with the commutator. This will cause the motor to underperform or fail to run, and may result in the brush burning out inside the holder.
Do I need to clean the commutator before fitting new brushes?
It is not strictly essential, but it significantly improves the chances of the new brushes bedding in correctly. Use a comm stick or very fine emery cloth only. Do not use regular sandpaper or any coarser abrasive – this can scratch or embed grit in the soft copper commutator surface, causing sparking and motor damage.
Do I need to change washing machine carbon brushes?
Do not fit new carbon brushes speculatively. Worn brushes are common, but a motor that has stopped running can have many other causes. Remove the brushes first and inspect them. A shiny, smooth tip means the brush is still making good contact. A charred, sooty, or damaged tip indicates a problem – but the underlying cause still needs to be identified before replacing.
Carbon brushes are one of the most commonly worn parts in a washing machine motor. This guide covers how to diagnose whether carbon brushes need replacing, how to identify brushes that are still serviceable, and what complications to watch for before starting a repair.
Always test motor insulation with an insulation test meter at 500V DC before working on any motor. Low insulation on a motor can blow electronic components on the PCB. Not all modern washing machines have carbon brushes – confirm the motor type before proceeding.
How to Tell If Carbon Brushes Need Replacing
The most reliable way is to remove the brushes from the motor and inspect them. Do not fit new brushes without first confirming the fault is actually caused by worn or damaged brushes. A motor that has stopped running can be caused by many other faults – fitting new brushes speculatively wastes time and money if the brushes are not the cause.
Heavy sparking from inside the motor can indicate worn brushes, but very small sparks during normal operation are common and not necessarily a fault. If sparking is excessive – particularly with flashing or arcing – the motor should be stopped and investigated before further use.
Worn Carbon Brushes – Identifying Good and Faulty

Left brush: good contact – smooth and shiny tip. Right brush: faulty – charred and sooty tip with evidence of burning.
Both brushes shown above are approximately 80% worn. The brush on the left is still making good contact with the armature – its tip is smooth and shiny, with no evidence of sparking. The brush on the right is faulty – the tip is charred and sooty with a charcoal-like appearance indicating burning.
If both brushes are smooth and shiny, they are still making good contact and are unlikely to be causing the fault – even if they are heavily worn and will soon need replacing. In this case, the cause of any motor problem lies elsewhere.
A Brush That Is Still Serviceable

Approximately 20% worn – smooth, shiny tip with no evidence of burning. This brush is still serviceable.
This brush is around 20% worn. The tip is shiny and smooth with no evidence of burning – it is making good contact with the armature and does not need replacing.
A brush can stick inside its spring-loaded holder even when not significantly worn. If this happens, the brush surface wears normally but the brush stops advancing to maintain contact with the armature. The result is a charred tip despite the brush not being heavily used – which can look similar to a heavily worn and failing brush. Always check that each brush moves freely in its holder.
Serious Brush Damage – Complications
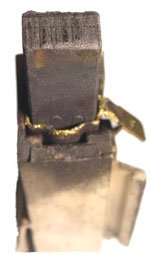
Approximately 50% worn but with severe arcing damage to the brass holder – this indicates a more serious motor fault.
This brush is around 50% worn but shows serious arcing damage to the brass holder caused by excessive sparking inside the motor. This level of damage indicates problems beyond worn brushes.
- Chunk broken from the brush tip – this often indicates a raised commutator bar on the armature. A raised or loose bar can be felt by placing a finger on the copper segments and slowly turning the armature. This type of fault requires a new motor.
- Machine has also blown a fuse – this indicates electrical shorting inside the motor. Diagnosing this requires an insulation test meter and electrical knowledge. Simply fitting new brushes will not resolve the fault.
- Damage to the brass holder combined with a blown fuse – the TOC (thermal overload cut-out) inside the motor may also have blown. This is no longer a straightforward brush replacement job and requires further investigation before proceeding.
When to Call an Engineer Instead
Fitting new carbon brushes in a motor is physically straightforward. However, without proper test equipment and experience working with motors, there is a real risk of misdiagnosis – and fitting new brushes into a motor with a more serious underlying fault will not solve the problem. If the brushes show signs of serious damage, or if the machine has also fused or blown components, a qualified repair engineer should assess the motor before any parts are ordered.
Buy carbon brushes
Frequently Asked Questions
How do I know if my washing machine carbon brushes need replacing?
Remove the brushes and inspect the tips. A shiny, smooth tip means the brush is still making good contact and may not be causing the fault. A charred, sooty, or damaged tip indicates the brush has been arcing. However, worn brushes alone do not confirm they are the cause of a motor fault – other causes should be ruled out first before replacing them.
Can I just fit new carbon brushes if the motor isn’t running?
Not without first confirming the brushes are the cause. A motor can stop running due to many other faults – a blown TOC, wiring fault, faulty winding, or armature damage. If brushes are fitted speculatively and are not the cause, the motor will still not run and money has been wasted. Inspect the brushes first and check for other causes. See: motor not running – main diagnostic guide.
What does it mean if the carbon brush holder is also damaged?
Arcing damage to the brass brush holder indicates excessive sparking inside the motor, which points to a more serious fault than worn brushes. If the machine has also blown a fuse, this suggests electrical shorting inside the motor. The TOC may also have blown. This is not a straightforward brush replacement job – further diagnosis with proper test equipment is needed before proceeding.